Computer controlled battery charger
This is a computer controlled charger. Actual charging is controlled locally, but it need commands from a computer to do anything.
It has lots of charging modes, some fairy safe, other very unsafe.
Contents
Computer controlled battery charger
Specifications
Design
The finished PCB
Software in the Arduino
How to use the charger
Regular charging modes
Charge modes explained
LiIon
NiMH
LiFePO4
NiMHV
NiMHVT
CCCV
DVDT
VOLTAGE
VOLTTOP
TIME
VOLTTIME
CAPACITY
CAPVOLT
Controlling the charger
Start
The safest charging modes
Modes with less safety
Modes without safety
SetCurrent & SetCurrent?
Off & Stop
Mode?
List
Values?
Read?
CalStart, Cal, Cal? & CalAll?
SaveConfig
SetId & Id?
Term?
FinalTime & FinalTime?
MaxTemp & MaxTemp?
TempSensor &TempSensor?
Status led
User software
File format
Calibrating the charger
Conclusion
Notes and download
Specifications
My specifications:
- Max charge current: 1.5A (Can be increased by replacing some components, but that will affect the low current).
- Min charge current: 50mA (10mA during CV)
- Charge voltage: 0V to 4.5V (The charger will do a fast shut down if voltage is around 4.7V)
- Uses 4 terminal sense on battery.
- Voltage measurement with around 1mV resolution, precision is nearly as good.
- Average current regulation is better than 0.5%.
- Support CC/CV, -DV/DT, voltage based charge, timed charging, charge specified capacity.
- Measures battery temperature with LM34 or LM35 sensor
- Data output for logging time, voltage, current, temperature, capacity and energy.
Design
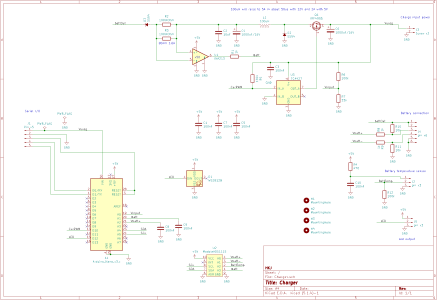
The idea was to use a Arduino processor for control and then supplement with a better ADC for measuring voltage and current.
For regulating the current I use a switcher transistor driven from a Arduino PWM output, I use a large smoothing capacitor on the output to get a stable current without much noise in it. Because I may use it together with a discharger that shares GND/minus between battery and USB, I had to use high side current sense, this required a small chip (very small chip) and also secures the voltage from the current sense resistors is amplified. The current output has a series diode to prevent back feeding from the battery.
For measuring I uses a ADS1115, it is a 15bit ADC with differential input, this is perfect for 4-terminal voltage measurement on the battery. I added 1kOhm series resistor on the voltage sense lines, this means the inputs can take about +/-10V without damaging the ADC. The two other inputs is used for current and battery temperature. This ADC is not very fast and I also measure the voltage and current with the Arduino for fast updates.
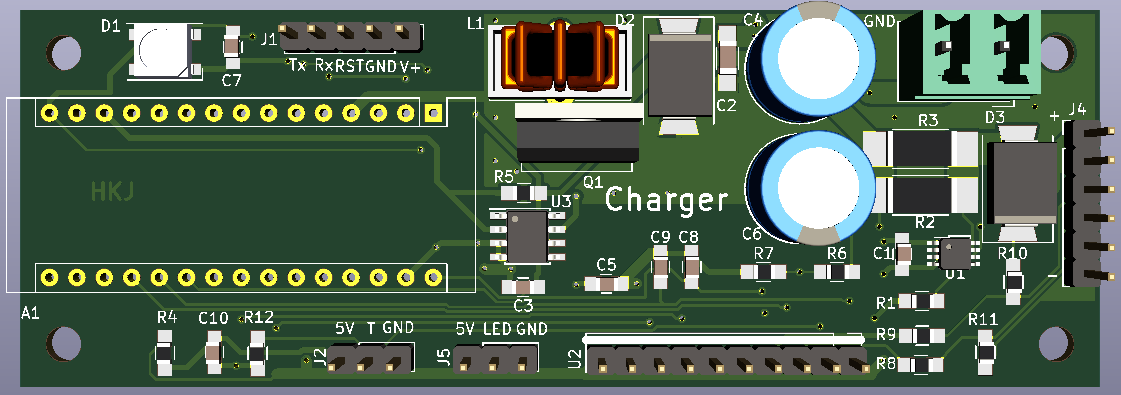
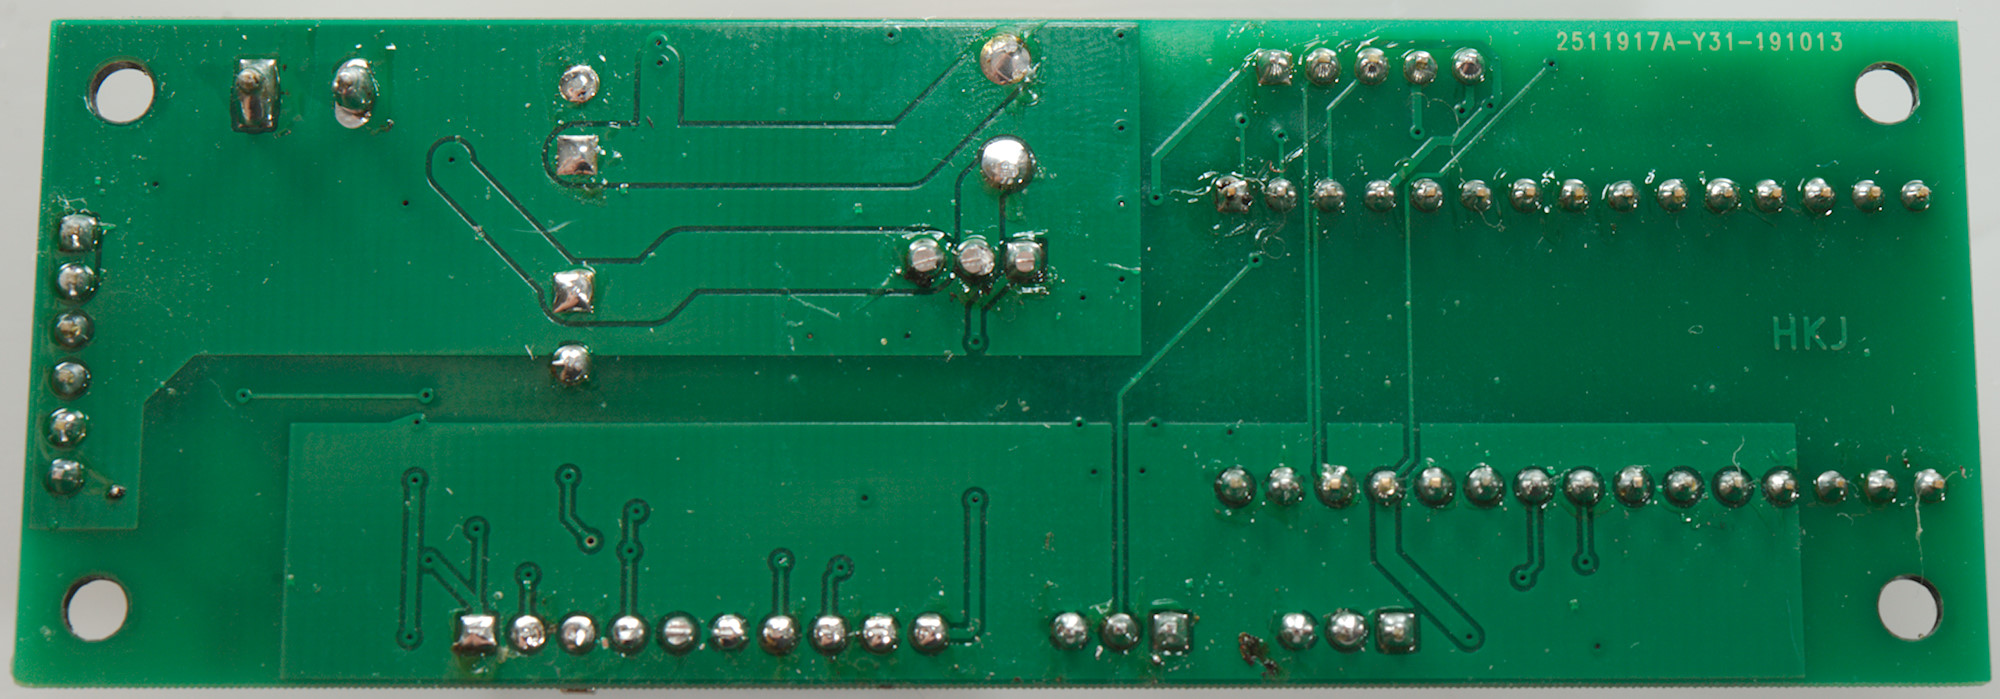
I did the layout and ordered a couple of PCB's (The above is version 2, my first prototype needed some modification).
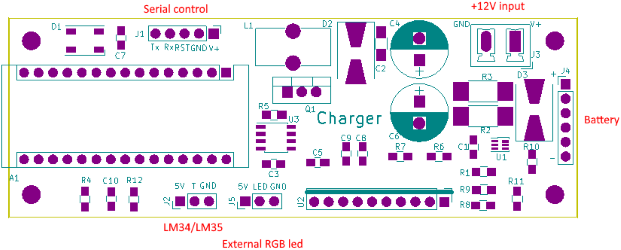
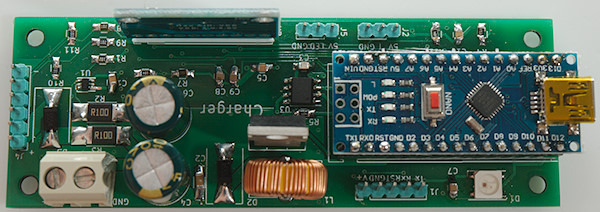
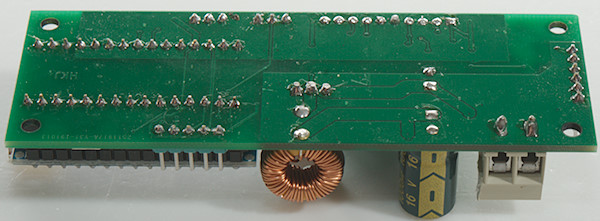
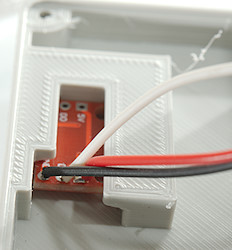
Connections to the PCB.
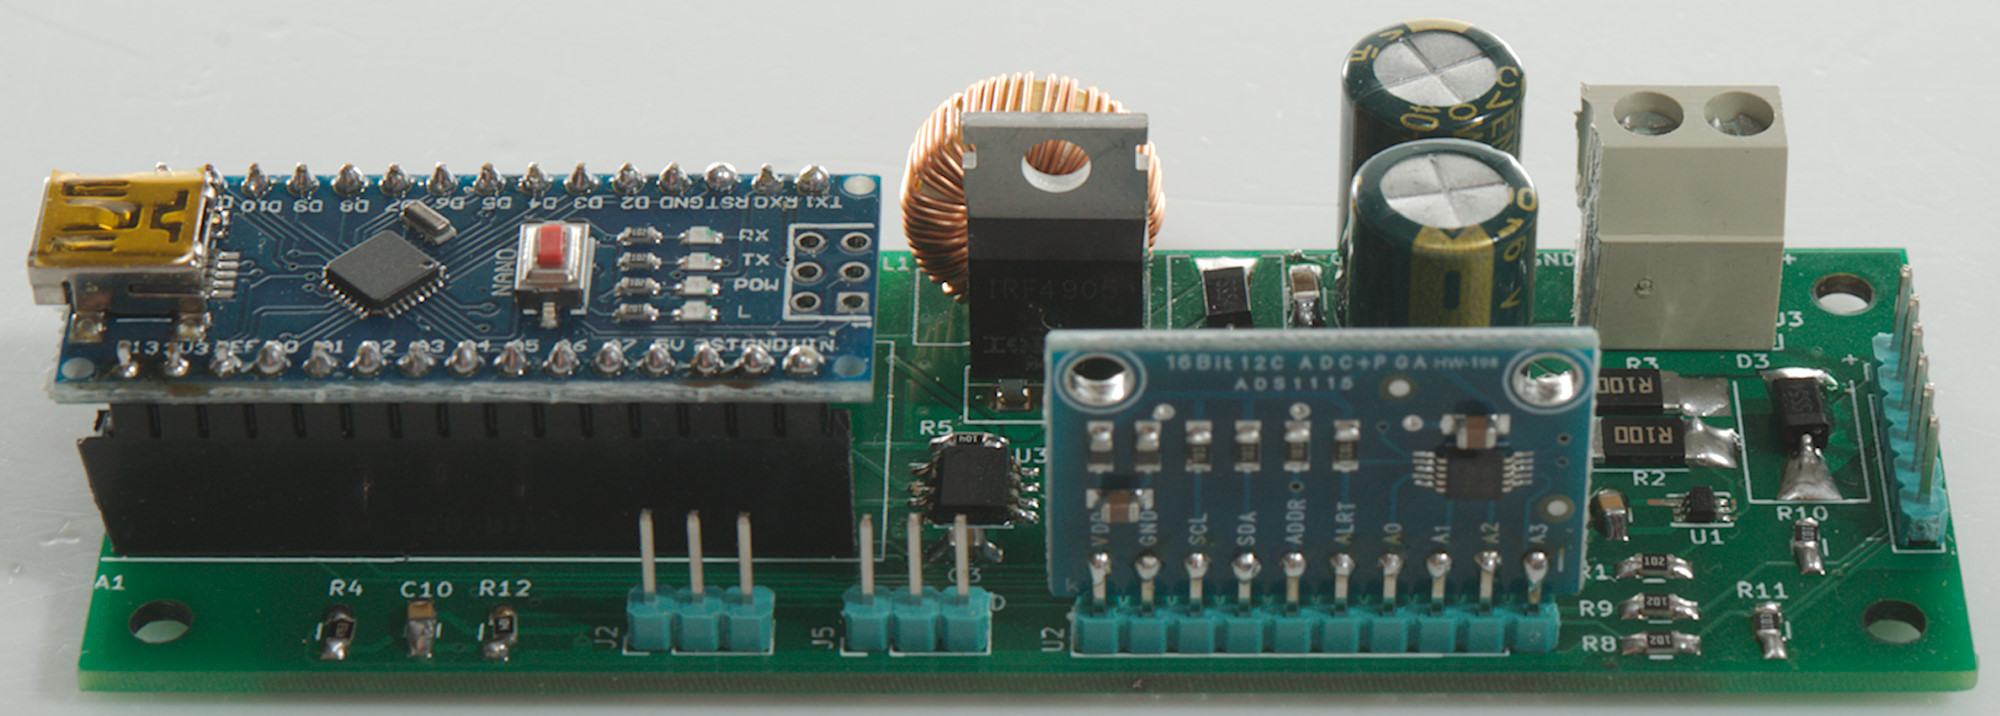
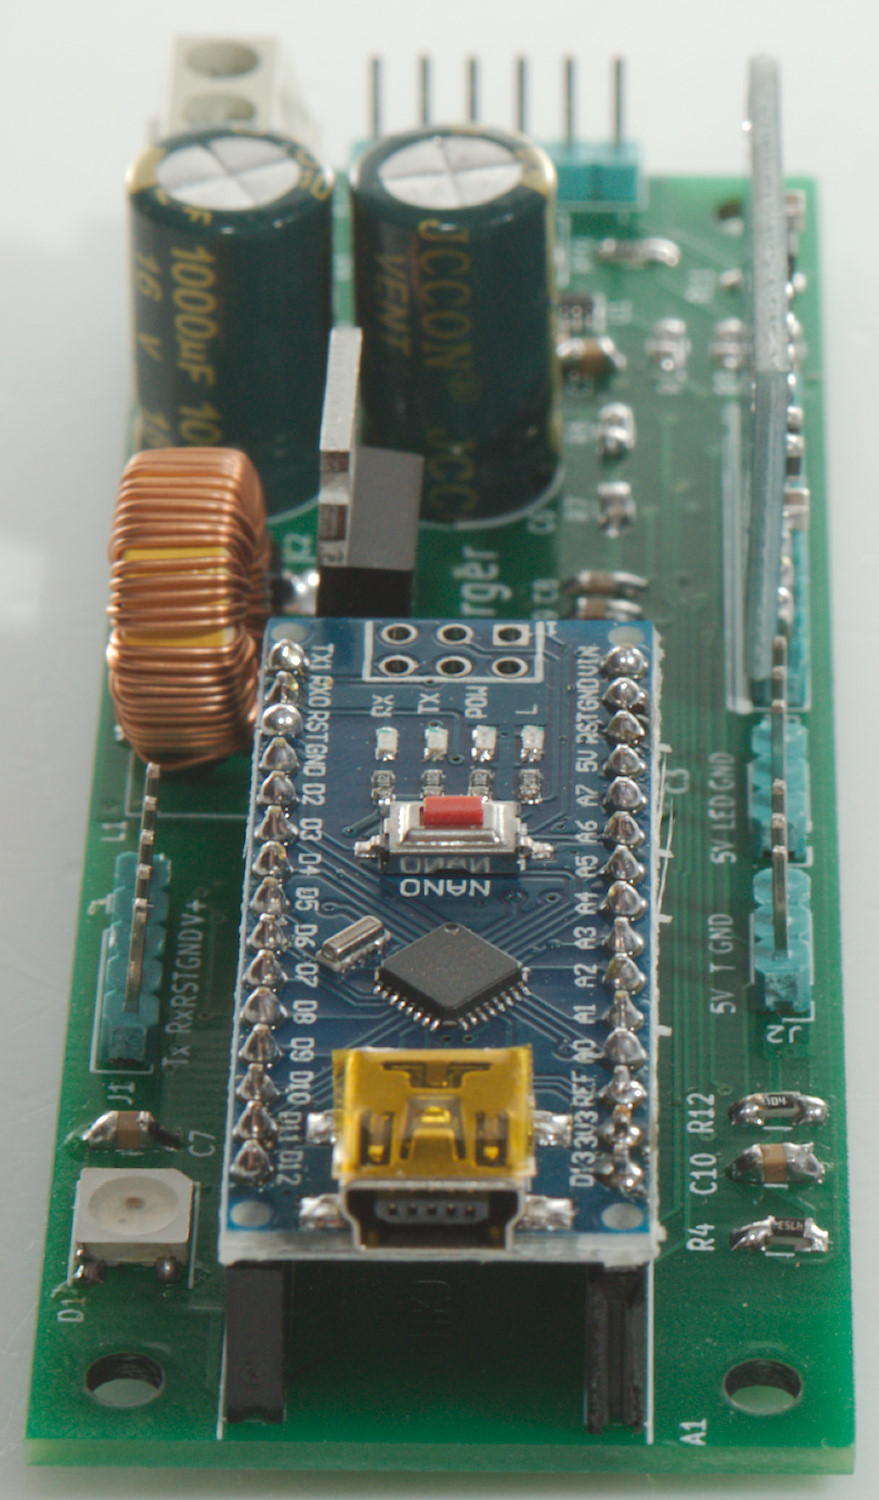
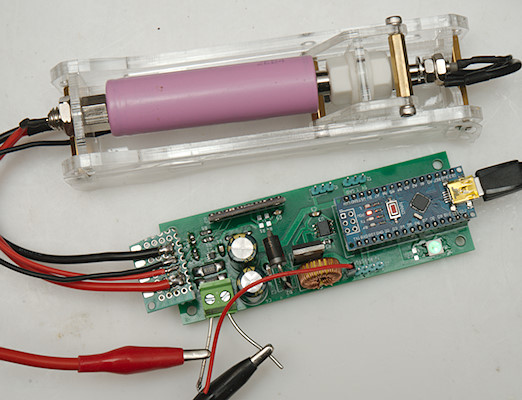
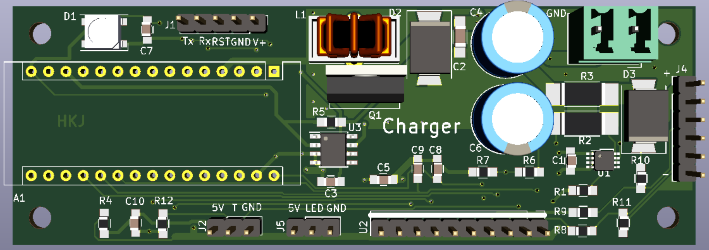
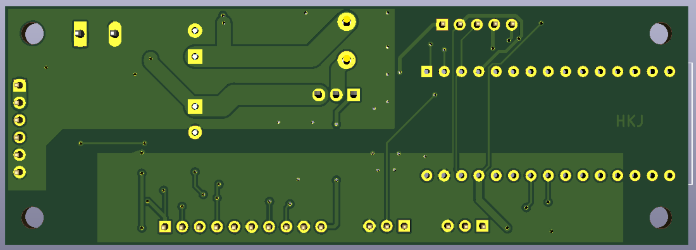
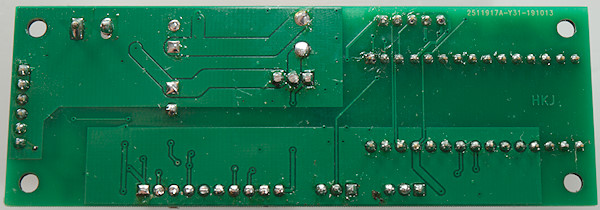
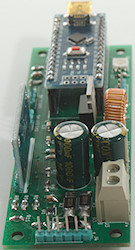
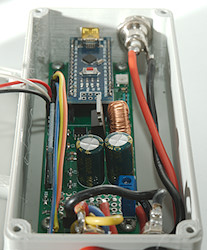
The finished PCB
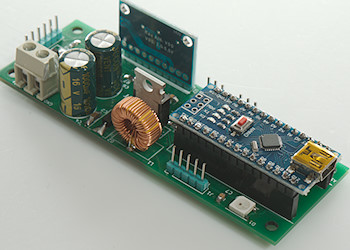
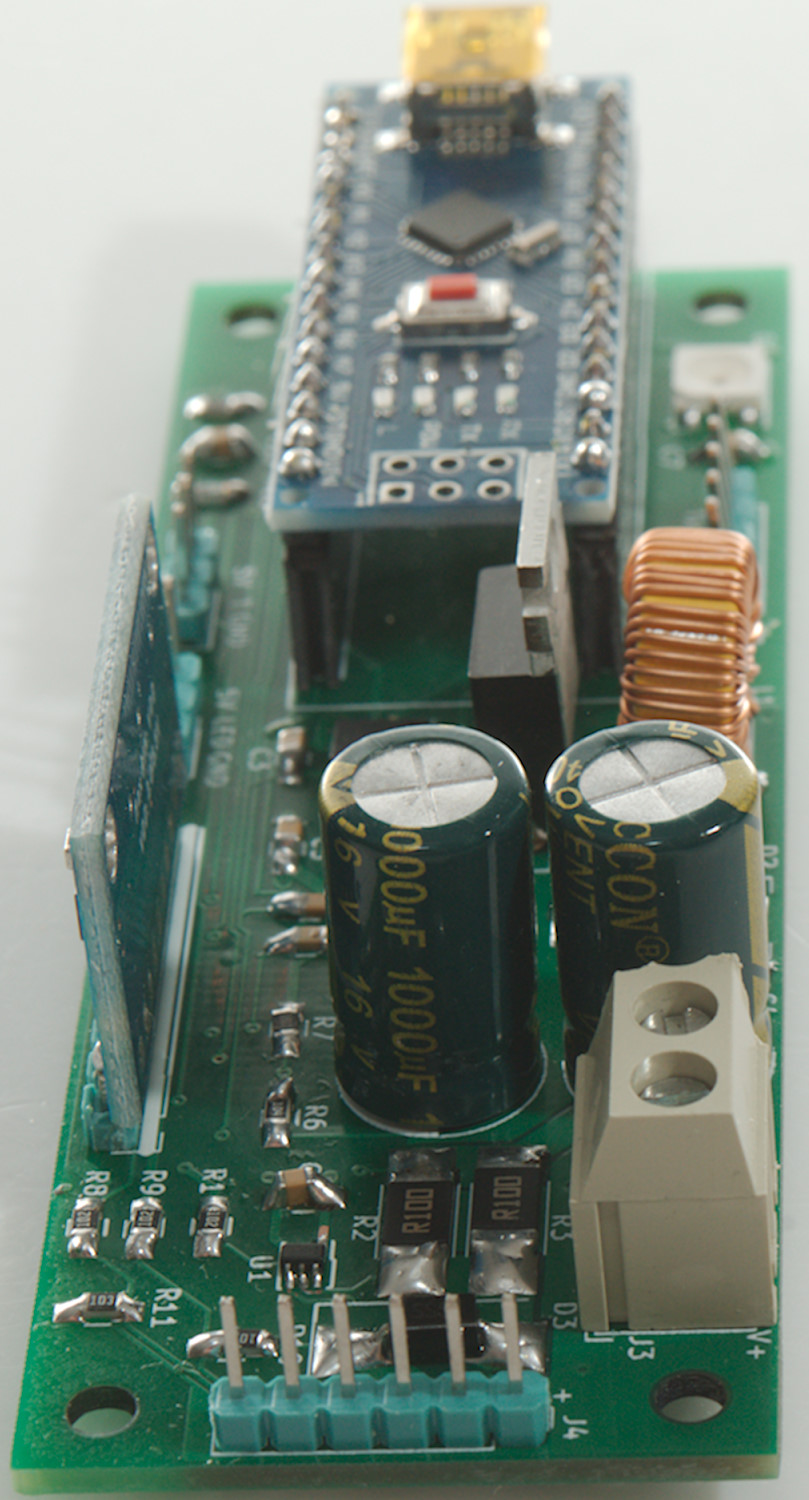
The finished circuit board with all the parts.
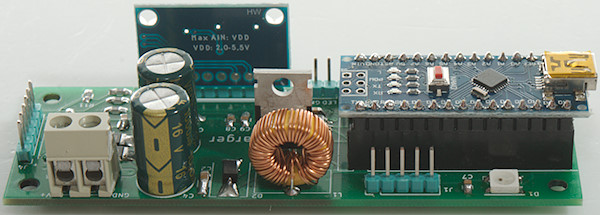


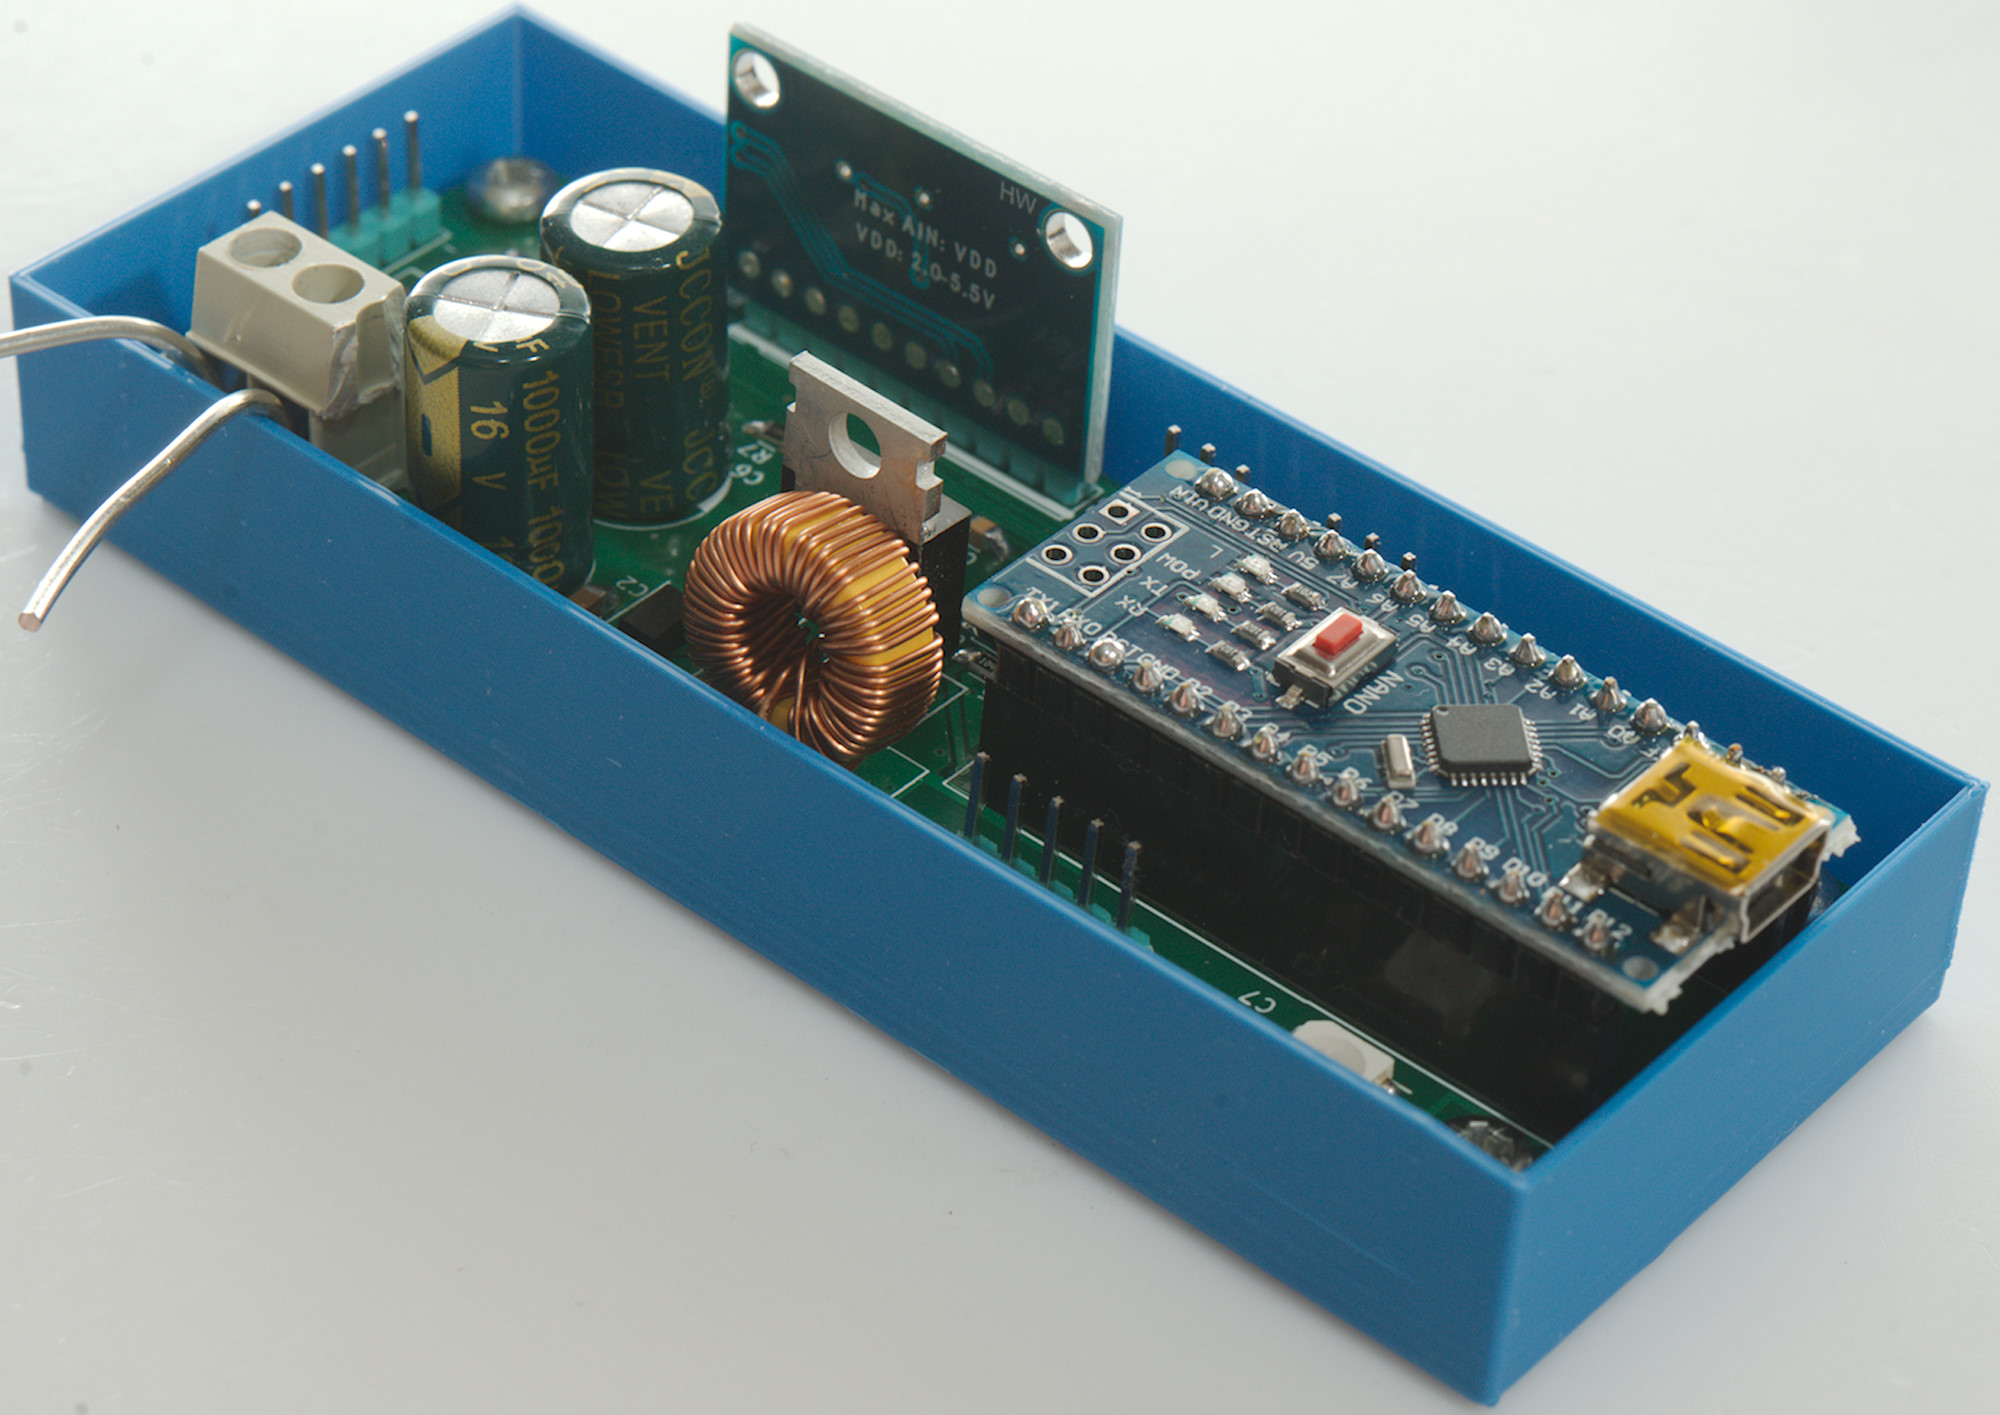
For testing it I made a open frame, it protects the circuit board from shorting to stuff around it, but it is still easy to measure on the board.
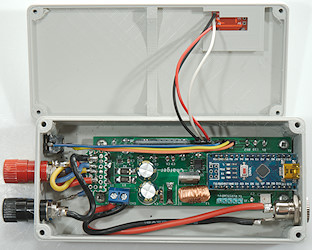
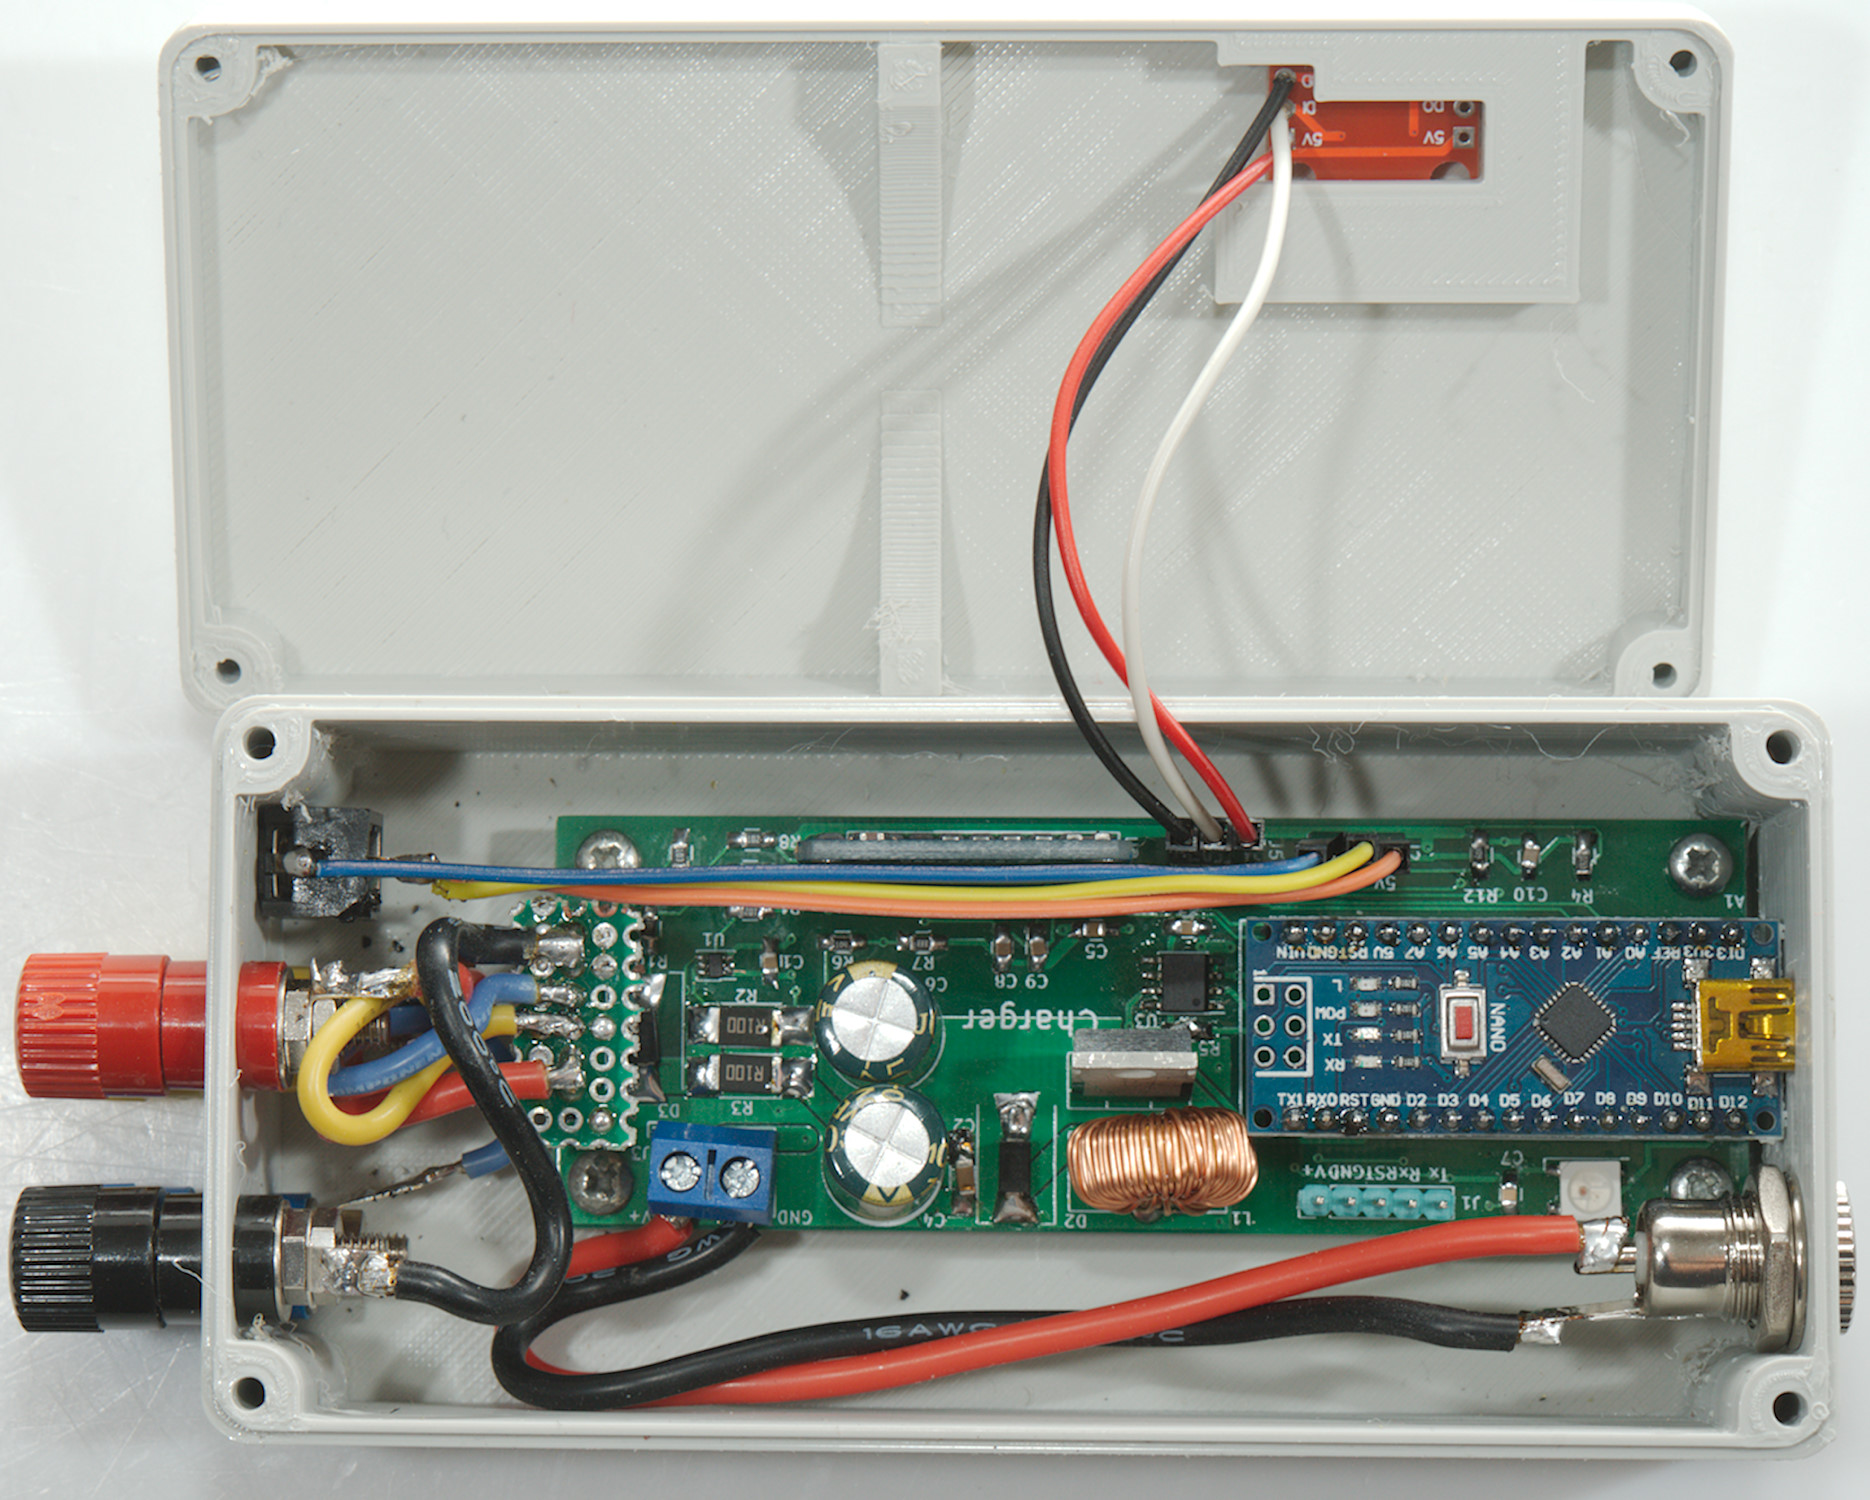
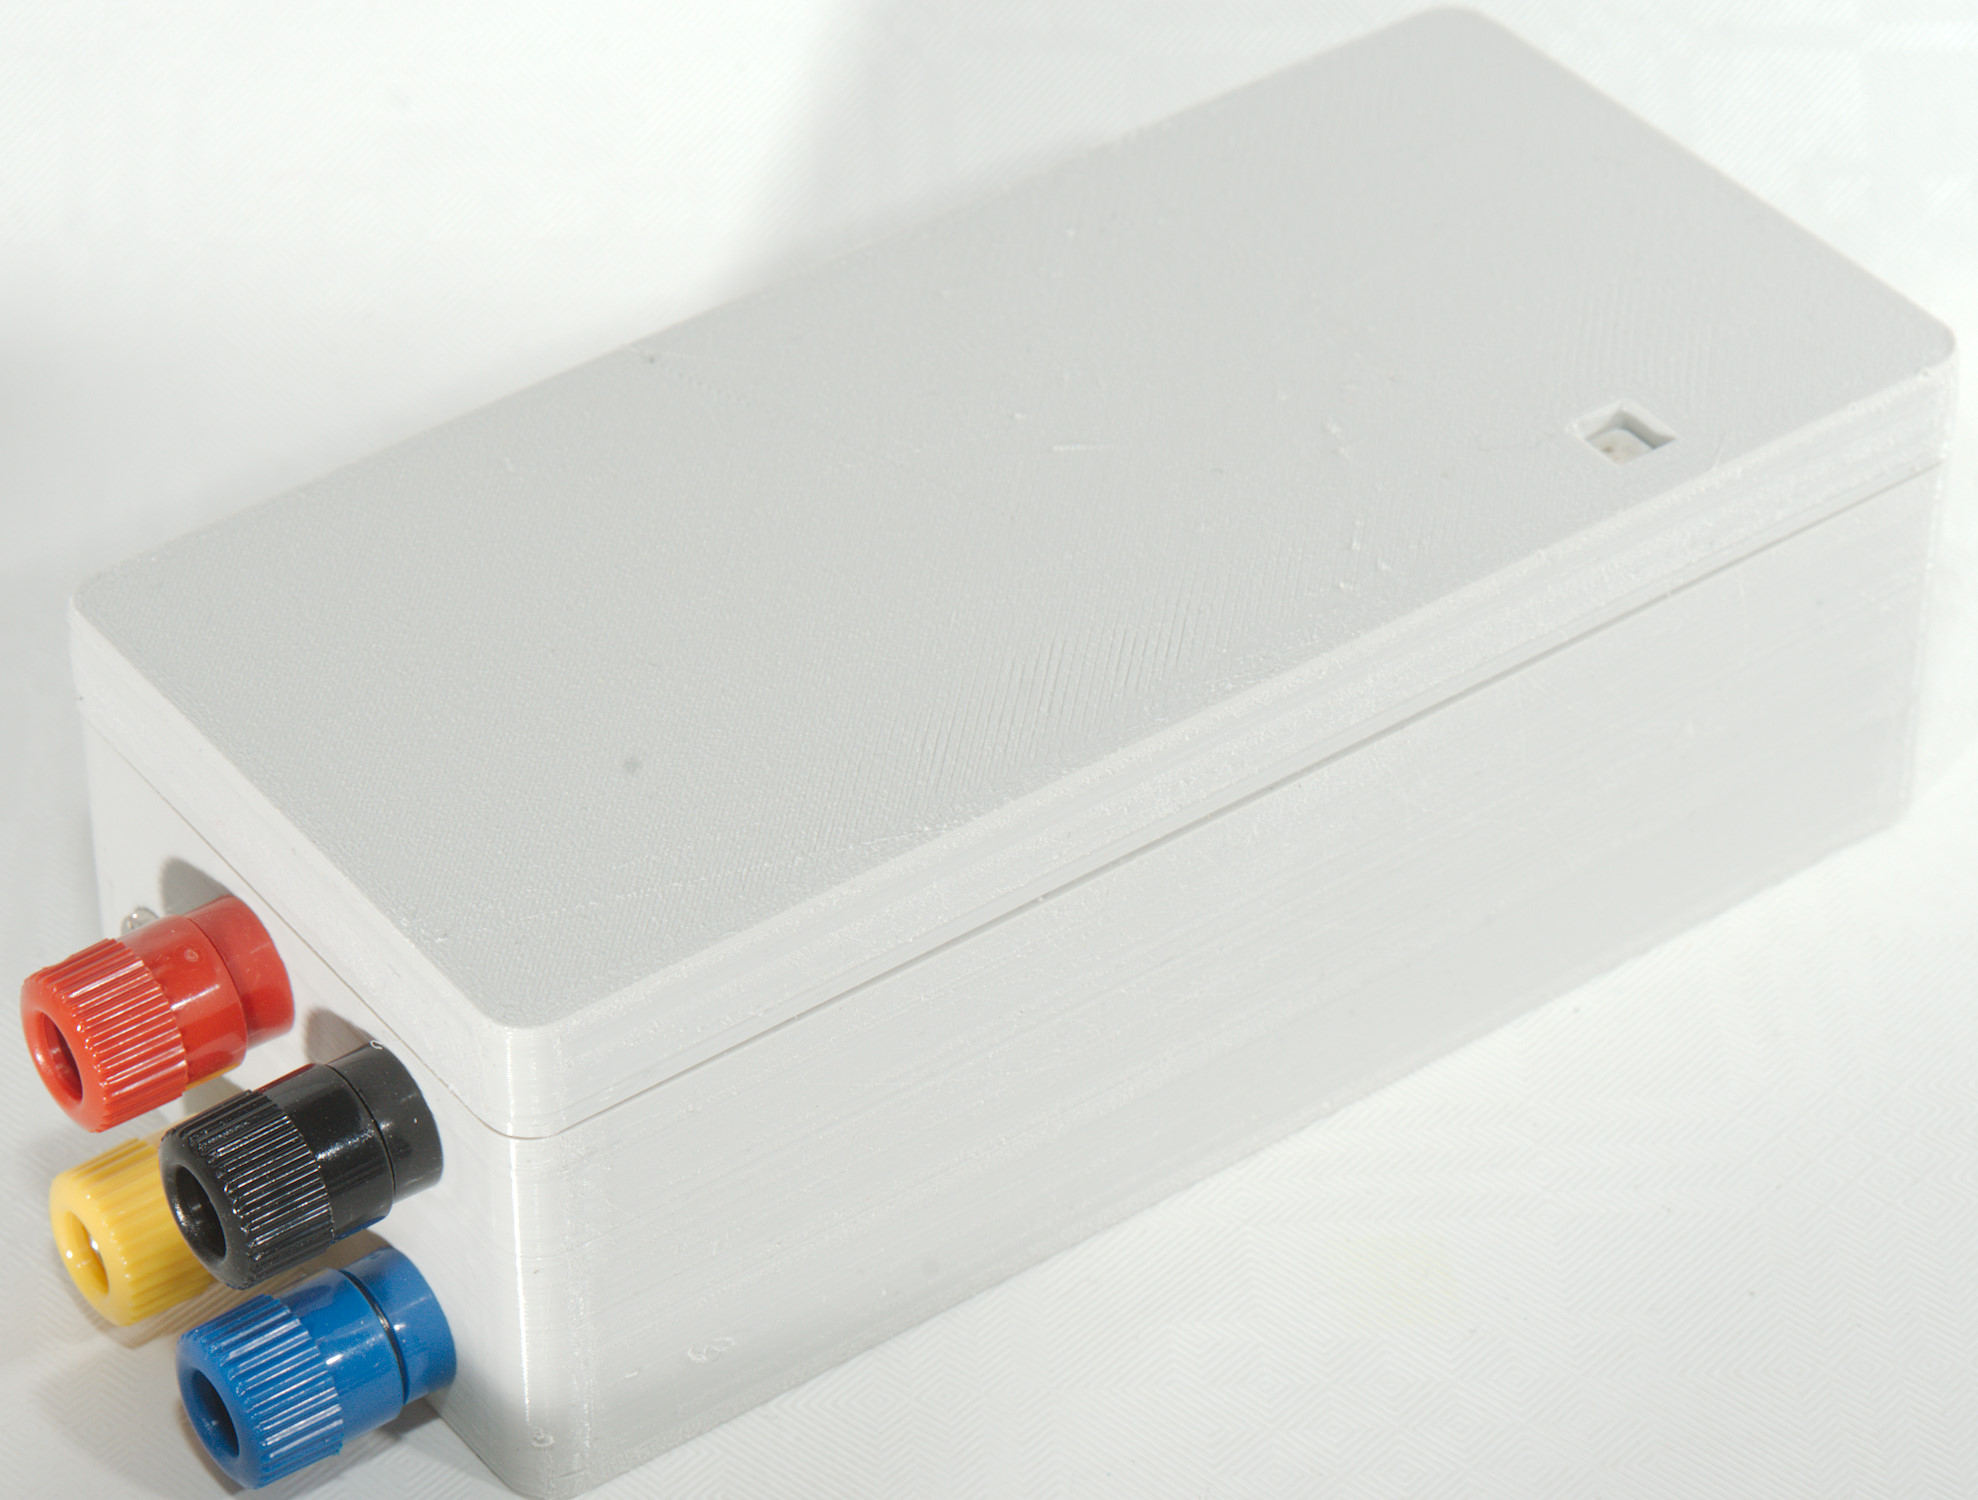
When I had tested a bit I designed a box for it.
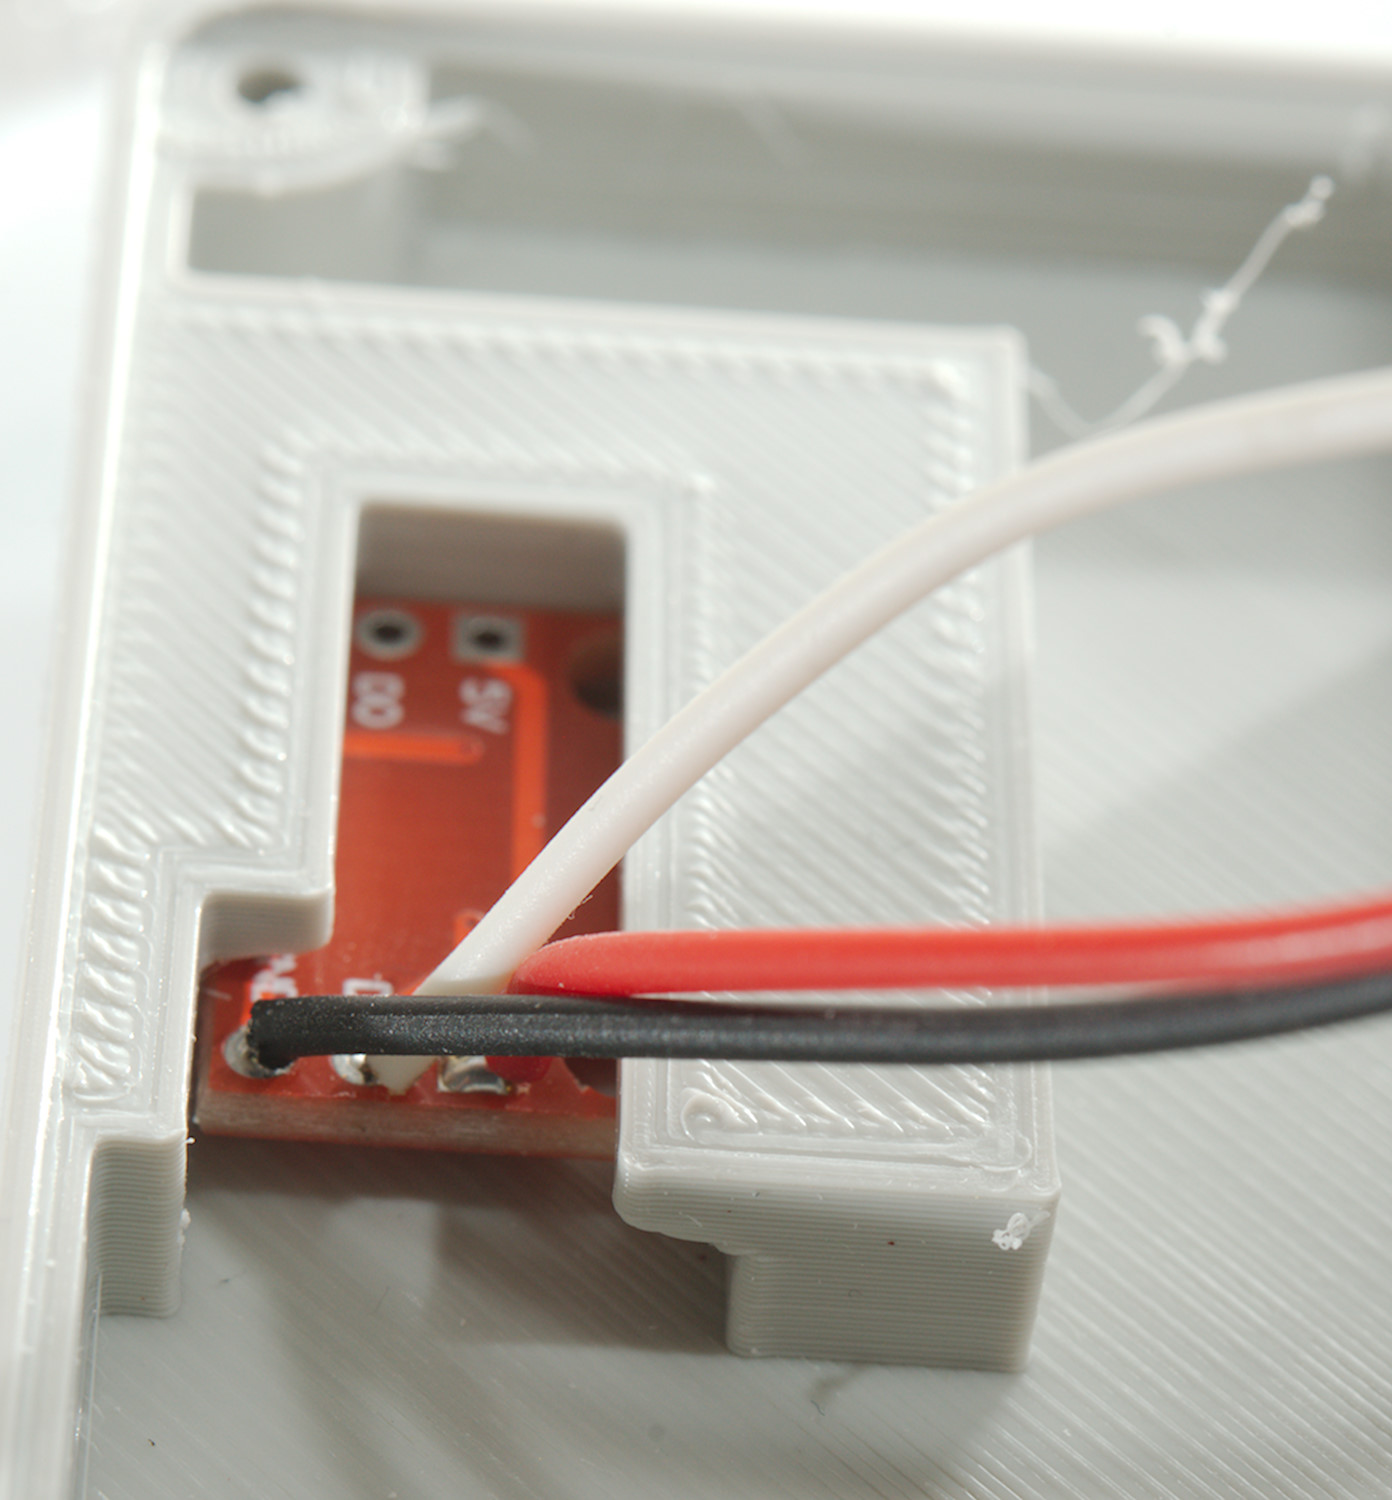
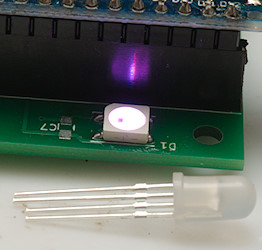
My first idea was to use a round LED, it uses the same serial protocol as the one on the circuit board, but I found out the colors was in a different sequence and decided to use a small breakout board with the same LED. The slot is fairly tight and I did not need any glue to hold the LED in place.

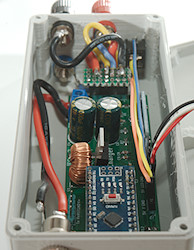
Closed box.

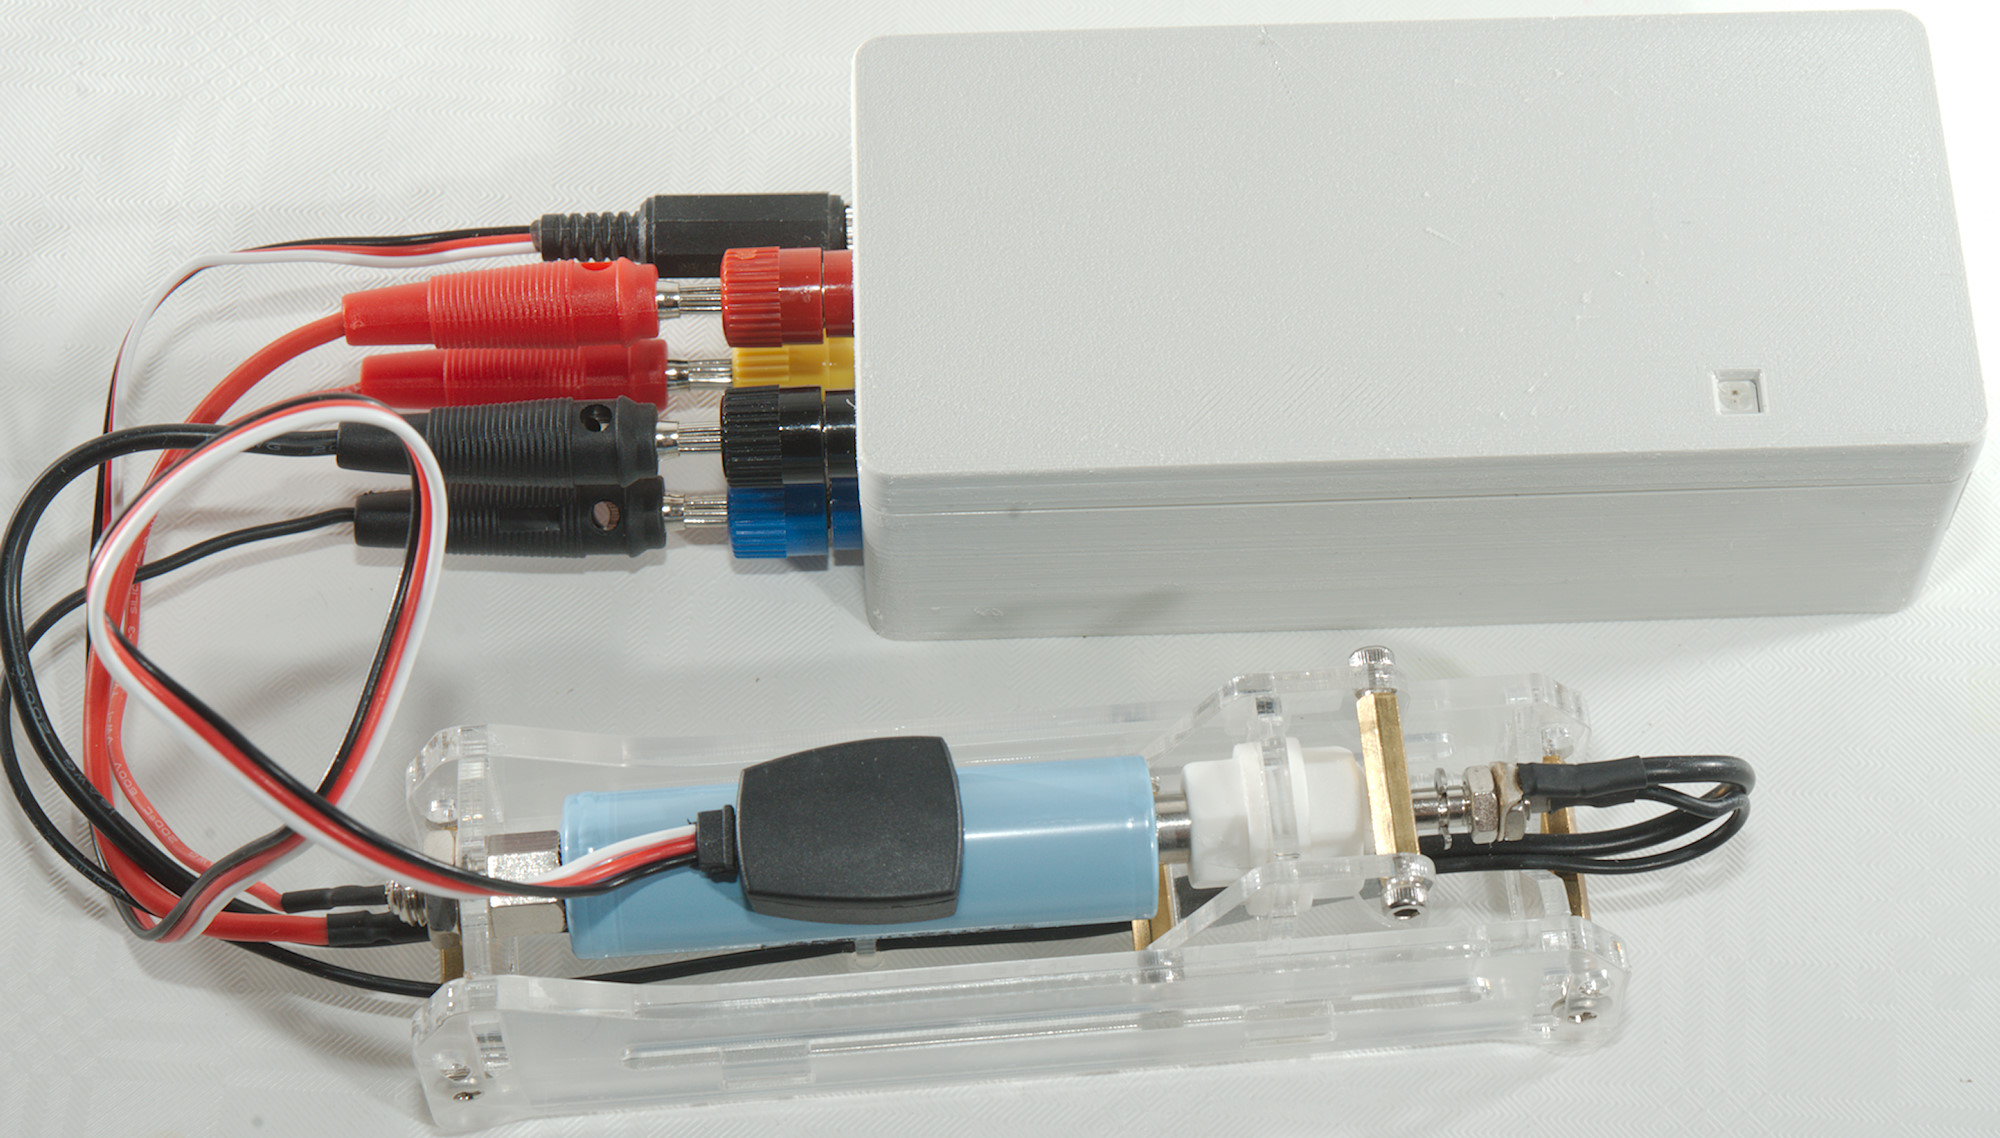
And here it is connected to a 4-terminal battery holder and I have also added a temperature sensor.
Software in the Arduino
The charger can be used for regular charging, but also have modes for testing different charge algorithms.
How to use the charger
The charger is designed for 3 different usage patterns:
- Just charging: Start the charger from a serial terminal.
- Charging and logging on a serial terminal: Use "Start xxx;list" with the terminal in a logging the session.
- Charging and logging controlled from another program: The program use "Read?" to get the logging data.
Regular charging modes
These modes are for everyday charging
- LiIon 4.2V charge batteries: Use LiIon mode.
- LiFePO4 batteries: Use LiFePO4 mode.
- NiMH batteries: Use NiMH mode.
- NiMH batteries alternate: Use NiMHV or NiMHVT mode. These two modes has less safety and termination will fail on some batteries.
Charge modes explained
LiIon
Code:
start LiIon current
start LiIon 1
Regular LiIon cell, uses CCCV mode with 4.2V with a termination current of 1/20 charge current
NiMH
Code:
start NiMH current
start NiMH 1
Standard NiMH charge mode with -dv/dt with 3mV as termination, it also have a backup setting of 0mV with a slower reaction time.
LiFePO4
Code:
start LiFePO4 current
start LiFePO4 1
Regular LiFePO4 cell, uses CCCV mode with 3.6V with a termination current of 1/20 charge current
NiMHV
Code:
start NiMHV current
start NiMHV 1
Use the VOLTAGE mode with a target voltage of 1.52V. Some NiMH cells will not terminate with this voltage.
Most batteries will termination, but I have seen one that never got to more than 1.48V
NiMHVT
Code:
start NiMHVT current
start NiMHVT 1
Use the VOLTAGE mode with a target voltage of 1.52V and will add a 1 hour top-off charge with TIME mode at 1/10 of charge current.
CCCV
Code:
start CCCV current voltage termination_current
start CCCV 1 4.2 0.1
This is constant current, constant voltage charging, it will charge to specified voltage and then reduce current while keeping voltage at specified value, when the minimum current setting is reached it will terminate charging.
This algorithm is used for LiIon and Pb batteries.
DVDT
Code:
start DVDT current voltage termination_current
start DVDT 1 3m
Charge with constant current while looking for a voltage that drops slightly, this will happen when the battery is full. There is a backup that looks for no voltage drop, but it has as 15 minute timeout. There is also a initial lockout of 5 minutes where the charger will not terminate.
This algorithm is used for NiMH and NiCD batteries.
VOLTAGE
Code:
start VOLTAGE current voltage
start VOLTAGE 1 1.52
Charge until battery reaches a specific voltage, this voltage is measured with current off.
This algorithm is often used for NiMH instead of -DVDT
VOLTTOP
Code:
start VOLTTOP current voltage top_off_current top_off_time
start VOLTTOP 1 1.52 0.1 1h
Charge until battery reaches a specific voltage, this voltage is measured with current off. Then charge with a lower current (top-off) for a specified time.
This algorithm is often used for NiMH instead of -DVDT
TIME
Code:
start TIME current time
start TIME 1 1h
Charge for a fixed time, this mode do not have any voltage limit.
It can be used for top-off on NiMH and NiCD batteries.
It is also the charge method that is listed in most NiMH specifications.
For LiIon batteries it is a very unsafe mode, use VOLTTIME instead.
VOLTTIME
Code:
start VOLTTIME current voltage time
start VOLTTIME 1 4.2 3h
Charge to a specified voltage for some time, when the voltage is reached the current will be reduced, this is a type of CCCV charging.
Many LiIon batteries are specified for this type of charging.
CAPACITY
Code:
start CAPACITY current capacity
start CAPACITY 1 1
Charge a specific capacity into the battery, this mode do not have any voltage limit. This is a very unsafe mode, use the CAPVOLT instead.
Capacity is in Ah
CAPVOLT
Code:
start CAPACITY current capacity voltage
start CAPACITY 1 1 4.2
Charge a specific capacity into the battery, if the specified voltage is reached the charge is terminated.
Controlling the charger
The charger needs a computer connection and is controlled with a couple of commands. The interface can be either USB or 5V serial.
Commands are not case sensitive, i.e. START, Start, start, stART will all work the same way.
Start
Start charging using one of the build in programs.
All charge modes have a temperature limit that will stop charging (See MaxTemp command).
The safest charging modes
These are shorthand ways to select a charging mode with safe parameters. The charger do not check if battery chemistry matches the selected mode and do not have any capacity or time limits.
Start LiIon current-> This used CCCV with voltage=4.2V and termination_current=current/20
Start NiMH current-> This used DVDT with drop_voltage=0.003V
Start LiFePO4 current-> This used CCCV with voltage=3.6V and termination_current=current/20
Modes with less safety
These two charge modes uses a fixed voltage for NiMH and will never stop if the battery do not reach that voltage.
Start NiMHV current-> This used VOLTAGE with voltage=1.52V
Start NiMHVT current-> This used VOLTTOP with voltage=1.52V, top_off_current=current/10, top_off_time=1h
Modes without safety
These are the raw modes where any value (Within the chargers capabilities) can be used for the parameters.
Start CCCV current voltage termination_current
Start VOLTTIME current voltage time
Start DVDT current drop_voltage
Start TIME current time
Start VOLTAGE current voltage
Start VOLTTOP current voltage top_off_current top_off_time
Start CAPACITY current capacity
Start CAPVOLT current capacity voltage
Start VOLTTIME current voltage time
SetCurrent & SetCurrent?
SetCurrent ampere
Deliver constant output current outside of any program. This can be used to check the calibration.
SetCurrent?
Query about current selected output current, will return current from programs.
Off & Stop
Two names for same command, will cancel any programs and turn output current off.
Mode?
Return current mode:
- CCCV: Charging with constant current / constant voltage
- DVDT: Charging with -dv/dt and 0dv/dt
- TIME: Charging a specific time
- VOLTAGE: Charging with voltage termination
- VOLTTOP: Charging with voltage termination, will change to time when done.
- CAPACITY: Charging with termination after specified capacity.
- FINALTIME: Charging done, final logging is still running.
- VOLTTIME: Charging with time termination, but limit voltage.
- CAPVOLT: Charging with capacity and voltage termination.
List
List output data in one of 3 formats:
List will use a TAB delimited format.
List . will use US CSV format, i.e. . as decimal comma and , as delimiters
List , will use EU CSV format, i.e. , as decimal comma and ; as delimiters
Any other command will stop a active list command.
Values?
Returns the current data line, similar to List, but with . as decimal comma and SPACE as delimiters.
Read?
This is an alternative to List for polled data acquisition and is more reliable than Values? for stable time sampling, because it buffers the data. Use it with a sample number: "Read? 10" and it will return data sample index 10 and clear all before it. The requested sample is not cleared and can be requested again if there is any problems with parsing the data.
If there is no data to return it will return - or if the charging is done #.
Format is the same as "Values?".
Note: Only time, voltage and current is buffered, temperature, capacity and energy is always a readout of the actual values (They change very slowly). The buffer can hold about 30 seconds of data.
When Read? has been used at least once during a charge the led will flash cyan/red if the buffer is full.
CalStart, Cal, Cal? & CalAll?
Used to calibrate current and voltage readings and check actual calibrations. There is four items that can be calibrated: I1, I2, V1 and V2, the are low and high current and voltage.
calStart item
Start calibration mode for specified item. It is also possible to use "calStart factory", this will not enter calibration mode, but change all the calibration parameters to the default values.
cal value
Store actual value for this item, this value must be read with a fairly precise meter.
cal? or cal? item
List actual calibration for item, when a calibration mode is active the command can be used without parameters to list the current calibration for the range.
calAll?
List all calibration items.
The calibration is not saved automatic and will be lost when the Arduino restarts, use SaveConfig to save it.
SaveConfig
Save calibration and other settings.
SetId & Id?
Define a ID and enquire about it. It is just a number form 0 to 255. This is saved with SaveConfig.
This can be used to distinguish between multiple chargers connected to the same computer.
Term?
Query about last termination, the possibilities are:
- Break: Connection to battery broke.
- CCCV: Regular CC/CV charge termination
- -DV/DT: Regular NiMH termination.
- 0DV/DT: Regular NiMH termination, used charge current is probably a bit low.
- Slow: The voltage on a NiMH increased very very slowly, charge current is probably way to low.
- Time: Termination when using a timed charge.
- Temp: Over temperature termination.
- Voltage: Voltage based charge terminated due to voltage.
- Reset: Arduino is restarted and has not done any charging since.
- Capacity: Specified capacity has been charged.
FinalTime & FinalTime?
Define how long time the charger will continue to log values after the charge is finished.
FinalTime 60 -> 60 seconds
FinalTime 1m ->1 minute
FinalTime 1h ->1 hour
It is possible to define from zero to hours.
MaxTemp & MaxTemp?
Set maximum temperature and read maximum temperature. This is saved with SaveConfig.
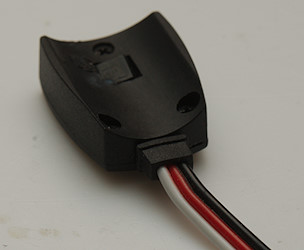
The temperature sensor with a build-in magnet, these can be bought on Ebay, search for "temperature imax b6".
TempSensor &TempSensor?
Define sensor used, default is LM35, but LM34 is also support and can measure temperatures down to about -17°C (Shown values will always be in Celsius).
TempSensor LM34
TempSensor LM35
TempSensor?
The sensor type must be save with SaveConfig to survive a reset
Status led
The charger has a multicolor status LED, this is a WS2812, there is a connector to add an external status LED parallel with the one on the circuit board.
Colors used on led:
- Green: Charger idle, i.e. not running a charge program.
- Blue: Charger running a charge or calibration program.
- Weak read: Output current is on
- Cyan: Blue+red, the normal color during charge.
- Yellow: Green+red, SetCurrent was used to turn current on.
- Bright red: Error
- Bright red flashing: Error, charge terminated, use Stop to remove error.
- Blue led flashing (cyan/red flashing): Read buffer is full.
Errors can be:
Missing external supply: The charger must be supplied from an external 12V supply, below 9V is an error.
Over current or over voltage: This can happen during regulation and is usually self correcting.
BREAK or TEMP termination: Led will flash
User software
The charger can be used directly from a serial terminal, but I do not plan on it and have written some software to control it. It is done in Java, this means it will work on Windows, MAC and Linux.
The screen dumps shown are not from the newest version of the software.
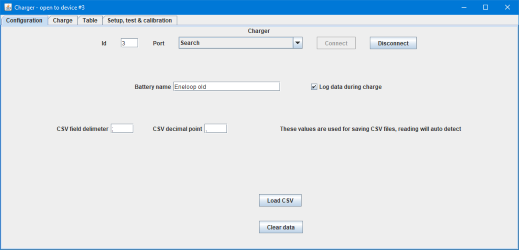
Initial screen for connecting to the charger or loading a old csv file for analysis.
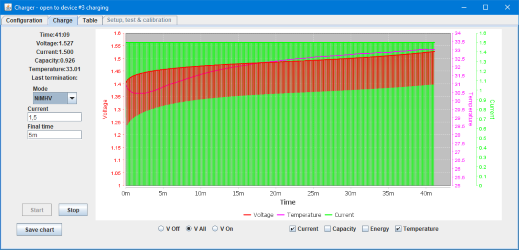
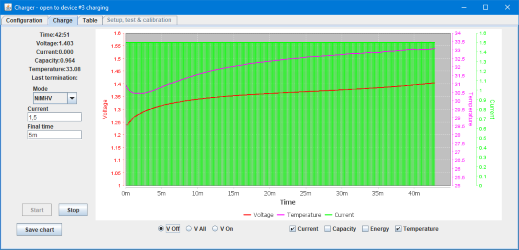
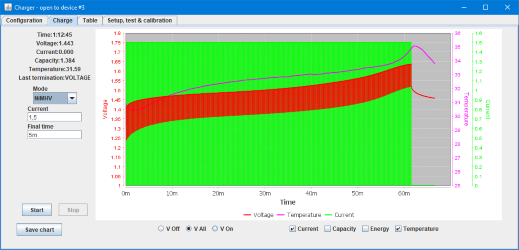
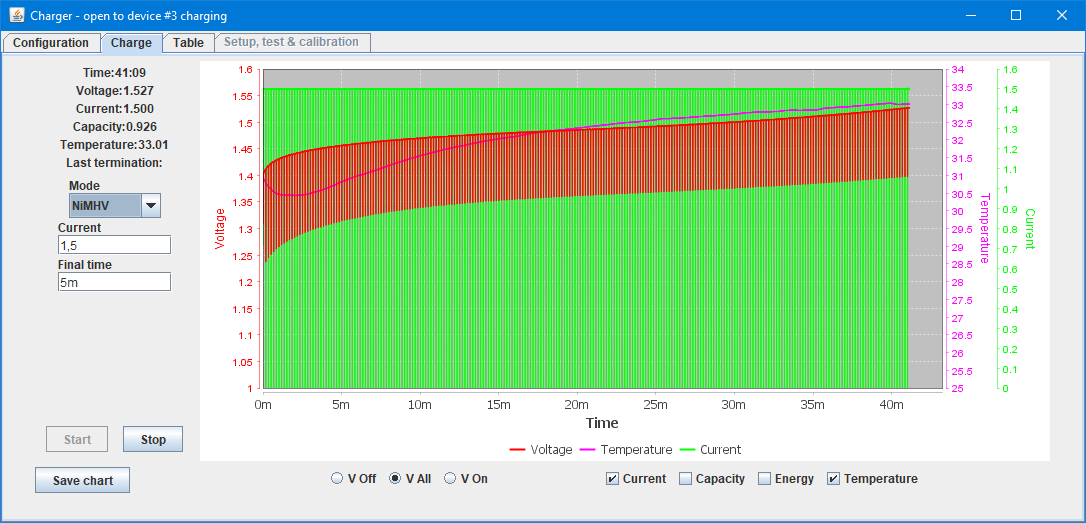
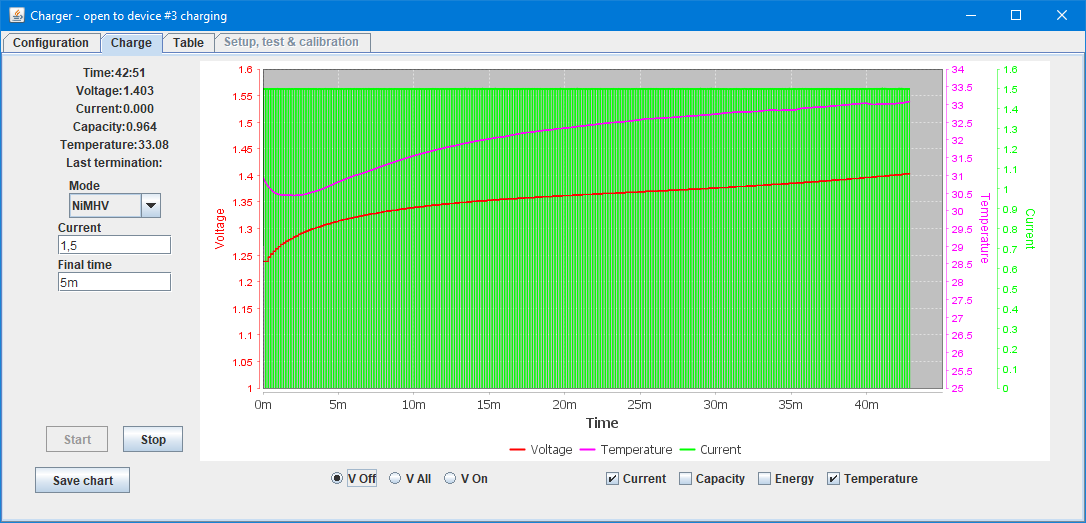
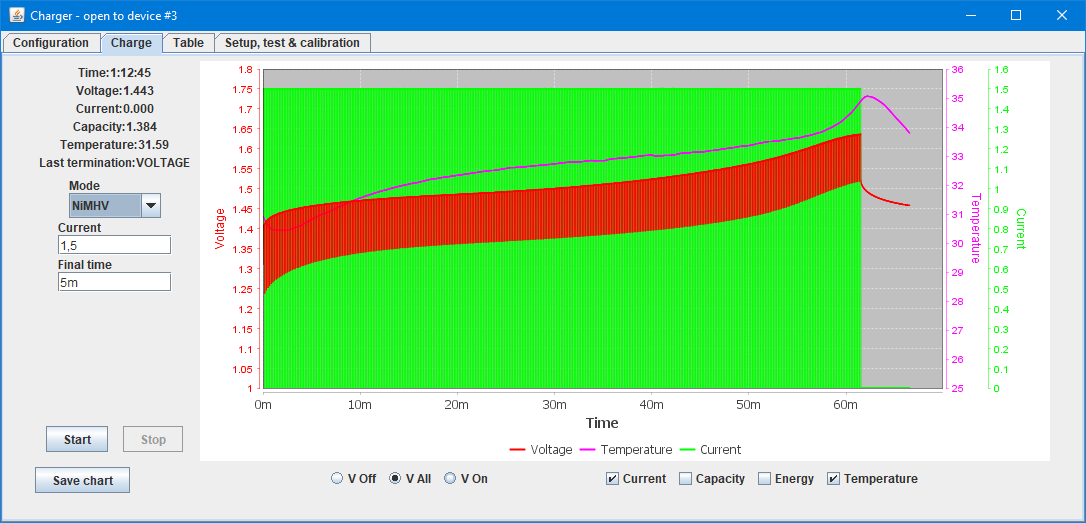
The charge control screen, the number of parameters to enter will change depending on selected mode.
The battery I test here is a old eneloop that at one time was used for my charger tests, but was retired a few years ago.
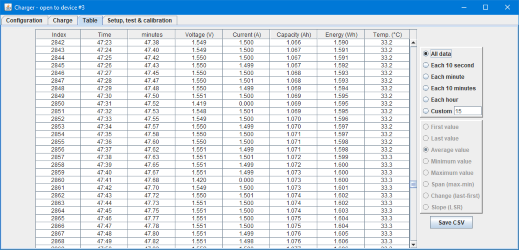
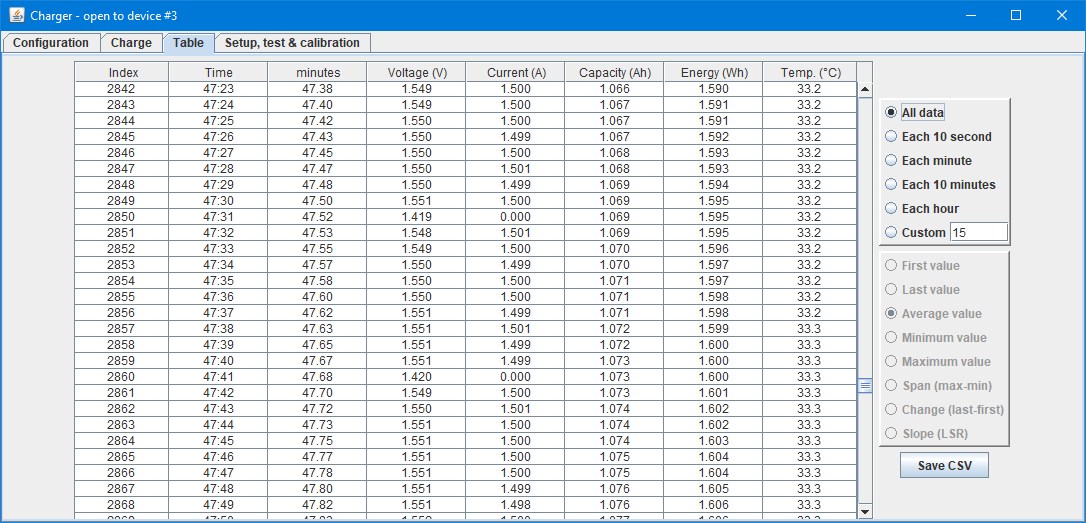
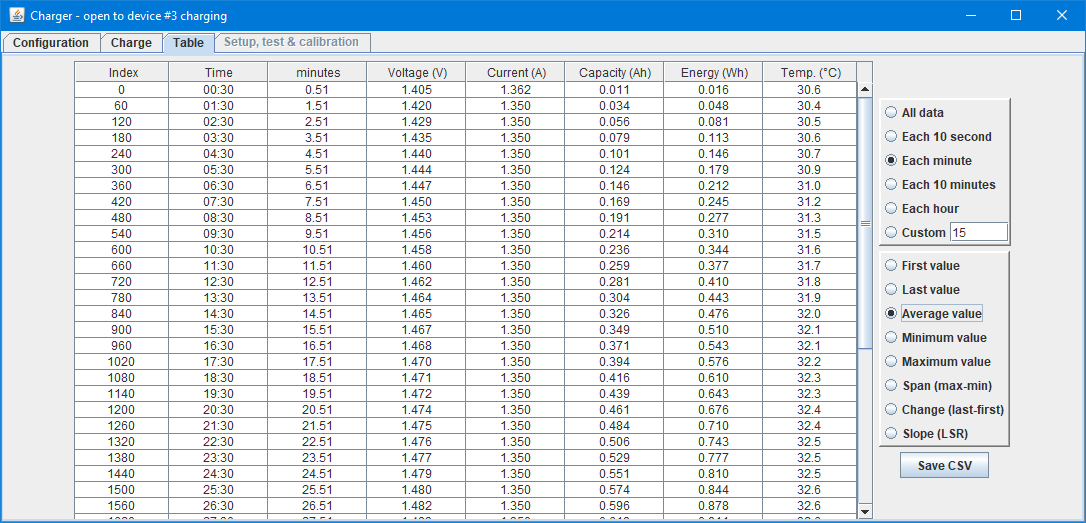
It is possible to see the log in numeric format
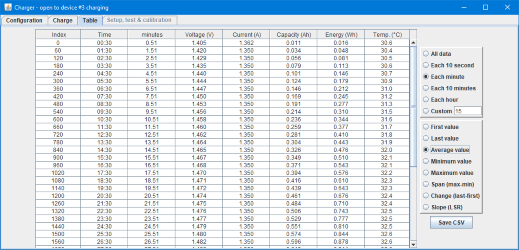
The data can be reduced in a couple of ways.
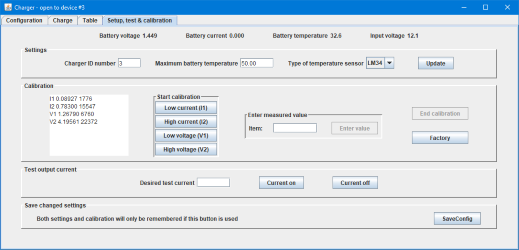
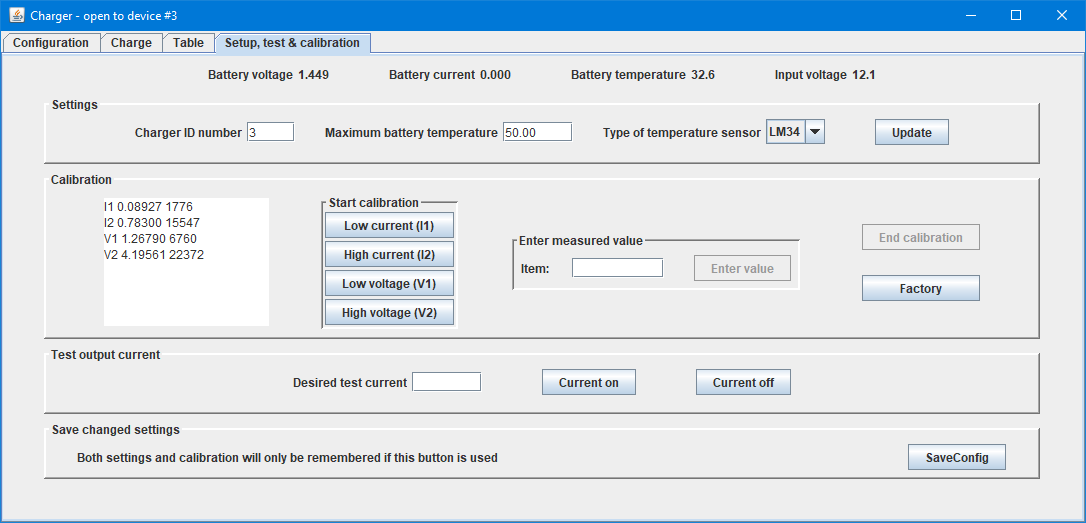
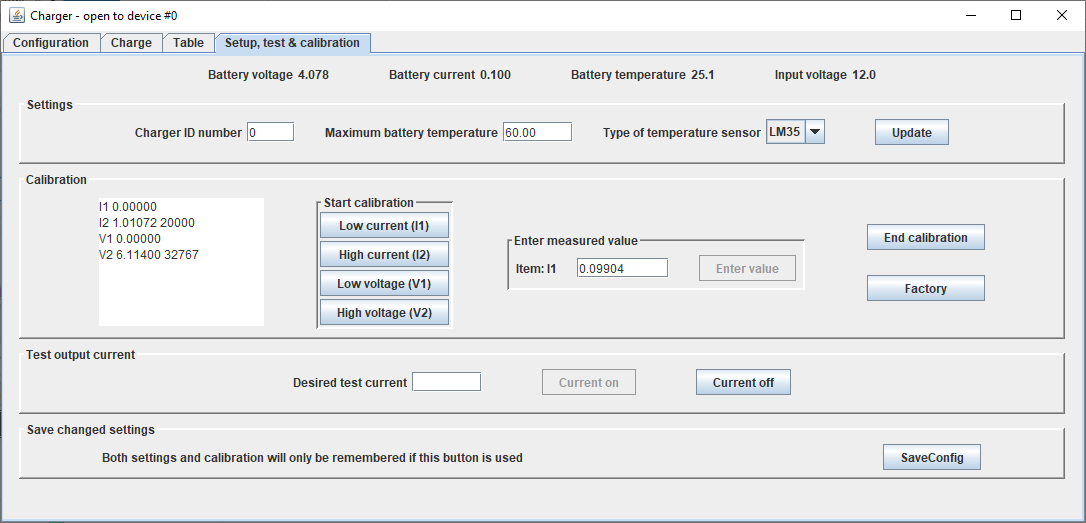
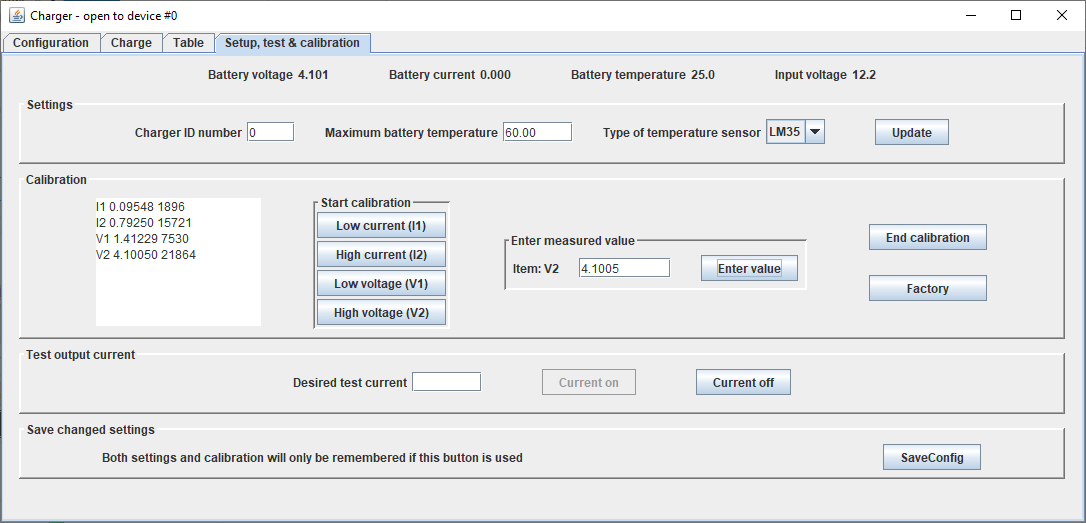
Adjusting the practical aspects of the charger, i.e. calibrating and setting a few configuration items.
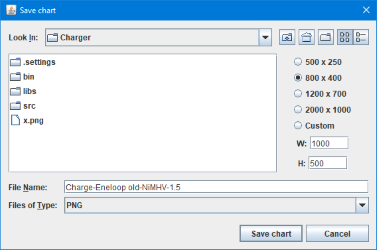
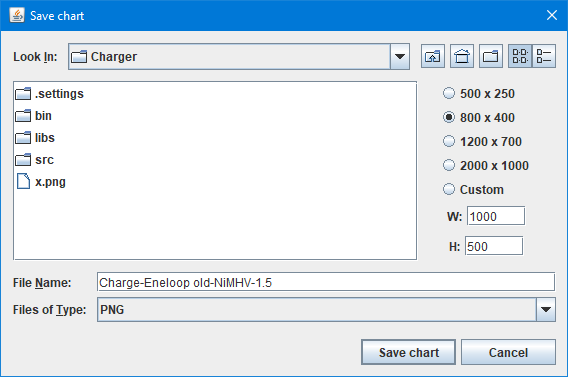
The chart can be saved in any size and will include the curves selected on the screen.
File format
The software can load any CSV file with the needed columns and display it. It can both handle charge and discharge curves.
When it generate CSV files it will use this line as the first line:
Code:
index;timeStamp;voltage;current;temperature;capacity;energy
If saving loaded files it will only include the columns that was also present in the original file.
The important columns are timeStamp, voltage and current. timeStamp is seconds into the charge/discharge and is used for displaying time and calculating capacity and energy if the columns are missing. Without the timeStamp curve the data will still be shown and it is assumed that there is 1 second between entries, but capacity and energy will not be calculated.
Calibrating the charger
This is a fairly simple operation and only requires a few batteries:
- A empty NiMH with voltage around 1.2V
- A empty LiIon that can be charged with 1A
- A full LiIon with voltage around 4.2V
It is not required for them being completely empty or full.
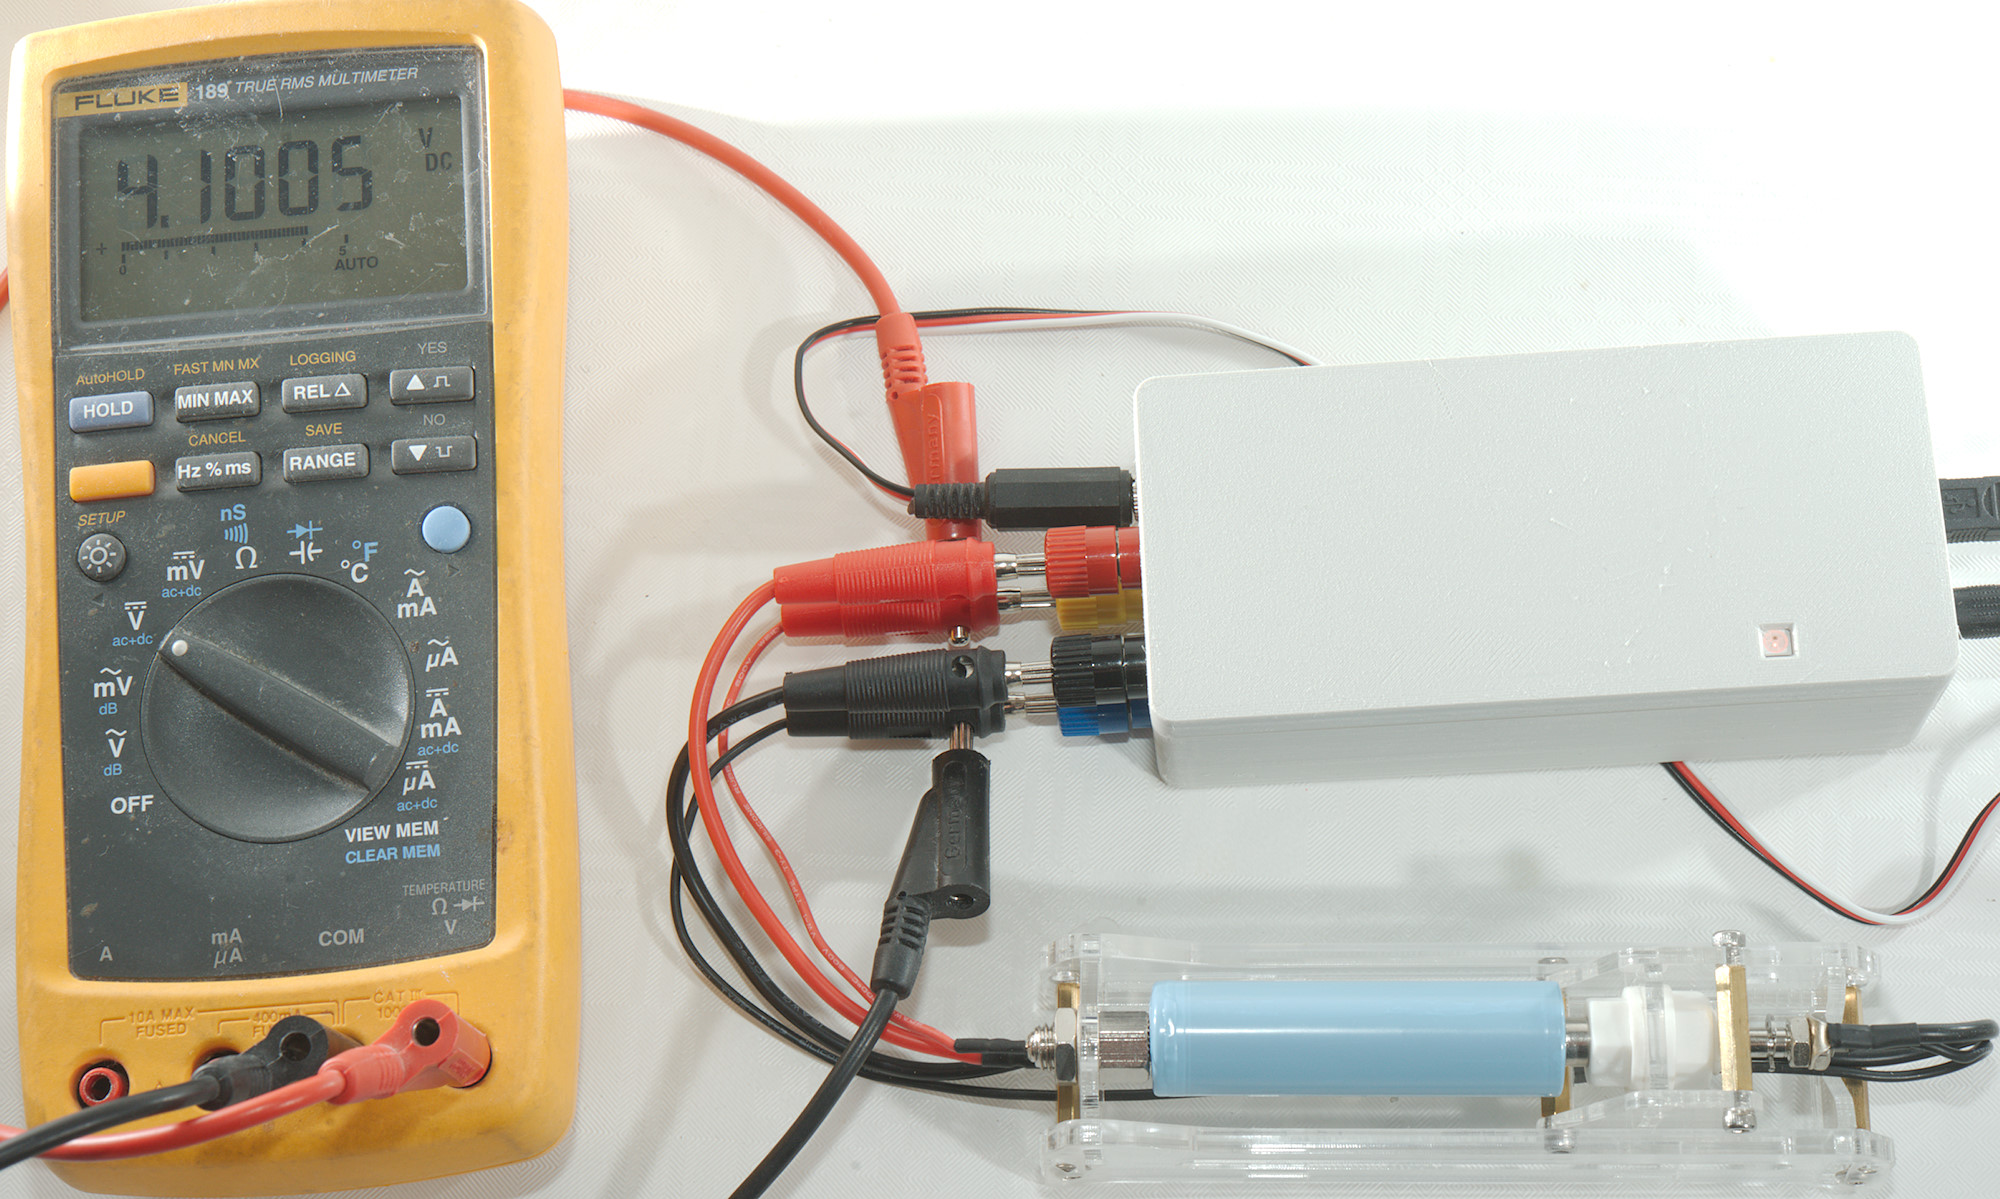
In addition to the batteries a multimeter is required, a 6000 count or more is best. It need a 200+mA range, a 2+A range and a 5+ Voltage range.
The numeric values listed below is for my calibration, the have to be replaced with the actual values from your meter.
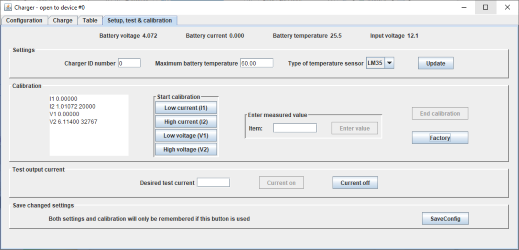
Calibration screen with factory calibration. There is four items to calibrate, two current and two voltages. Any of the point can be recalibrated at any time, but if the calibration gets too much besides the correct value it is necessary to press factory and start over.
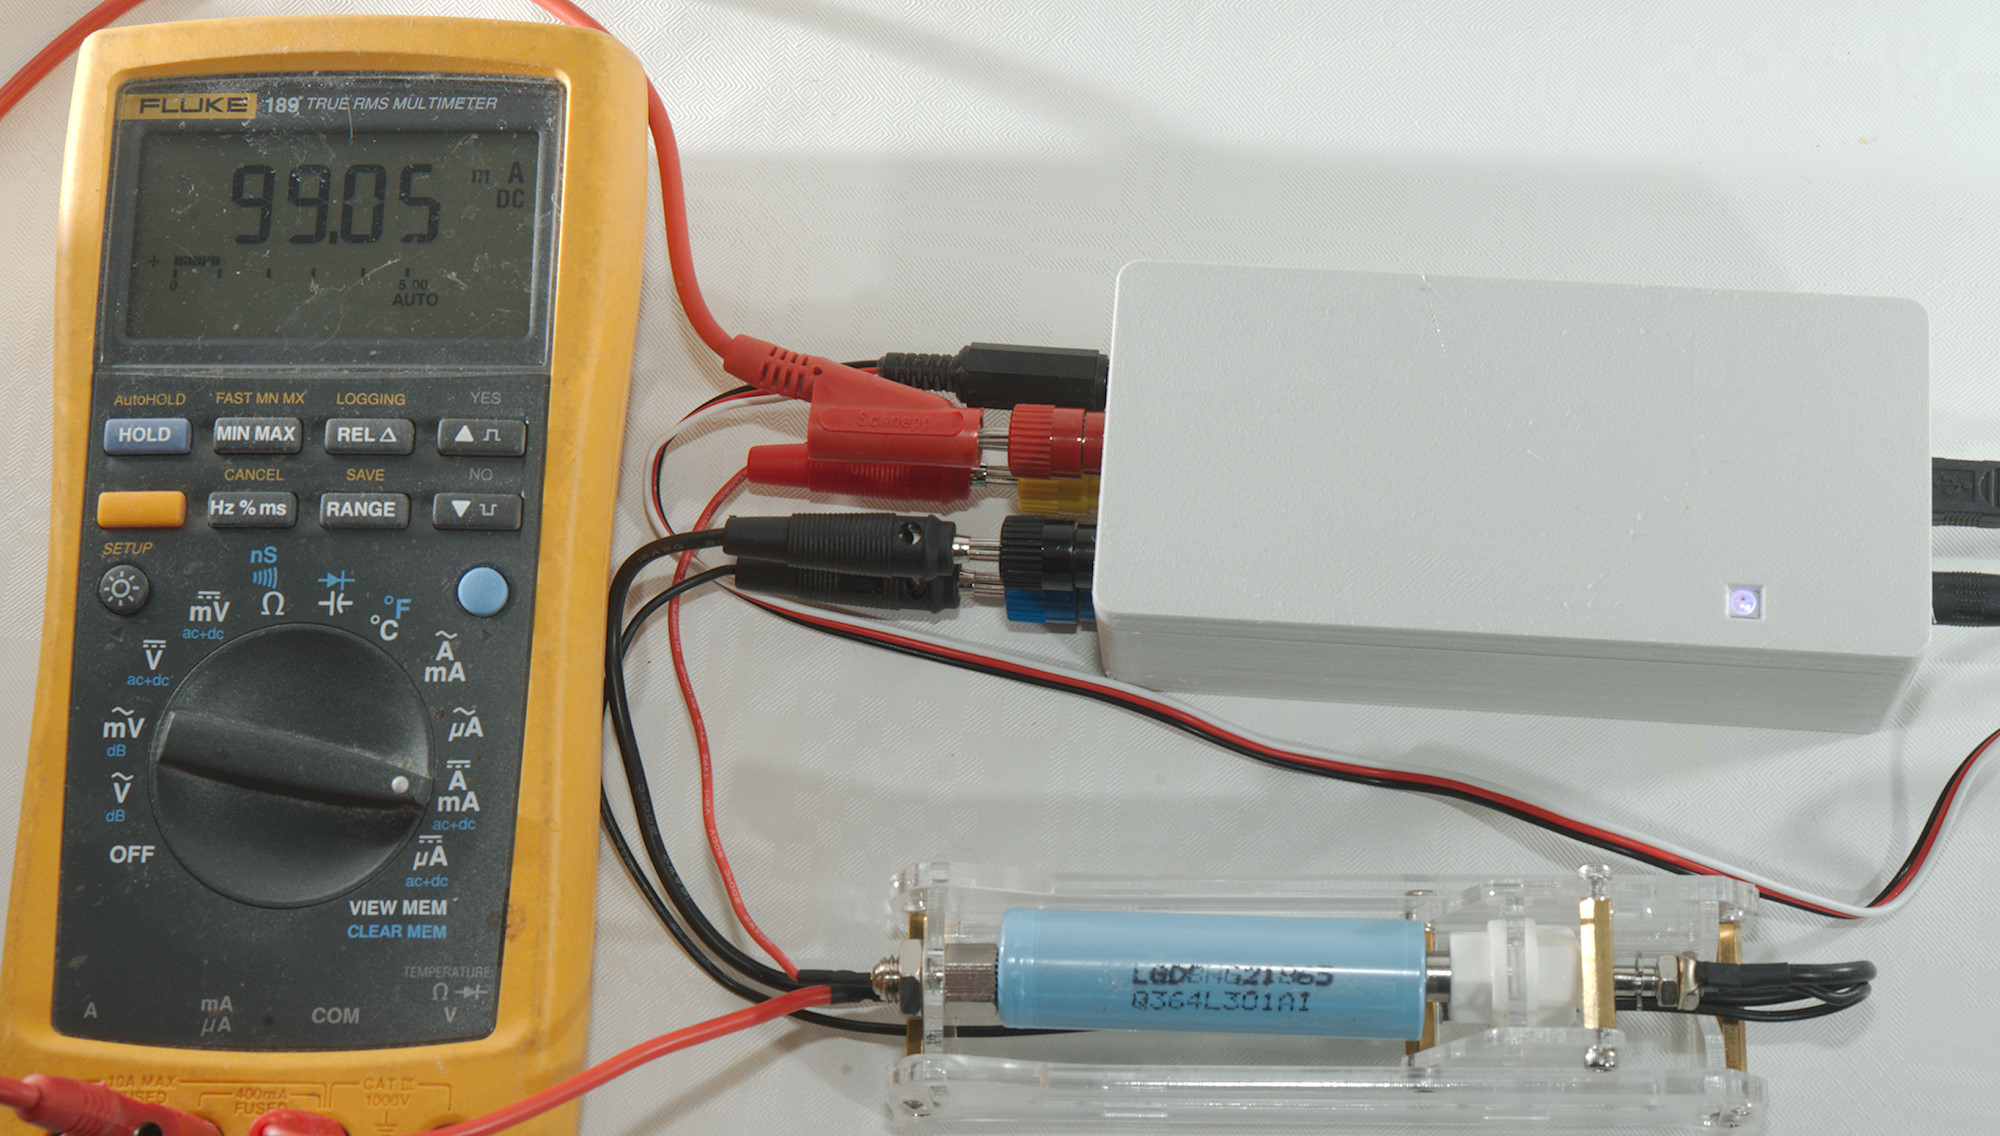
For current the empty LiIon battery is used.
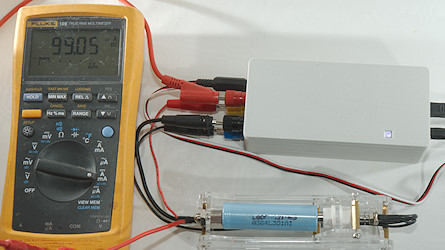
First setup is for the low current (I1), connect the mA range on the meter in series with the battery and press the low current button (Do not press the high current button, it will blow the fuse in the meter) or write "calStart I1" in a terminal.
The meter is supposed to show something around 80mA to 100mA, it will probably change a bit. Wait a minute or two for the value to get mostly stable.
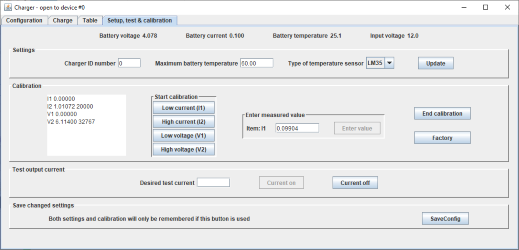
Enter the value in the program, press enter and then the "Enter value" button. The I1 constant on the screen and the charger will be update. In a terminal write "cal 0.09904" (Or what the actual reading is).
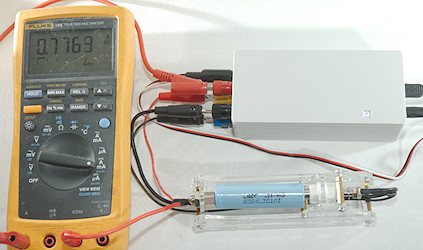
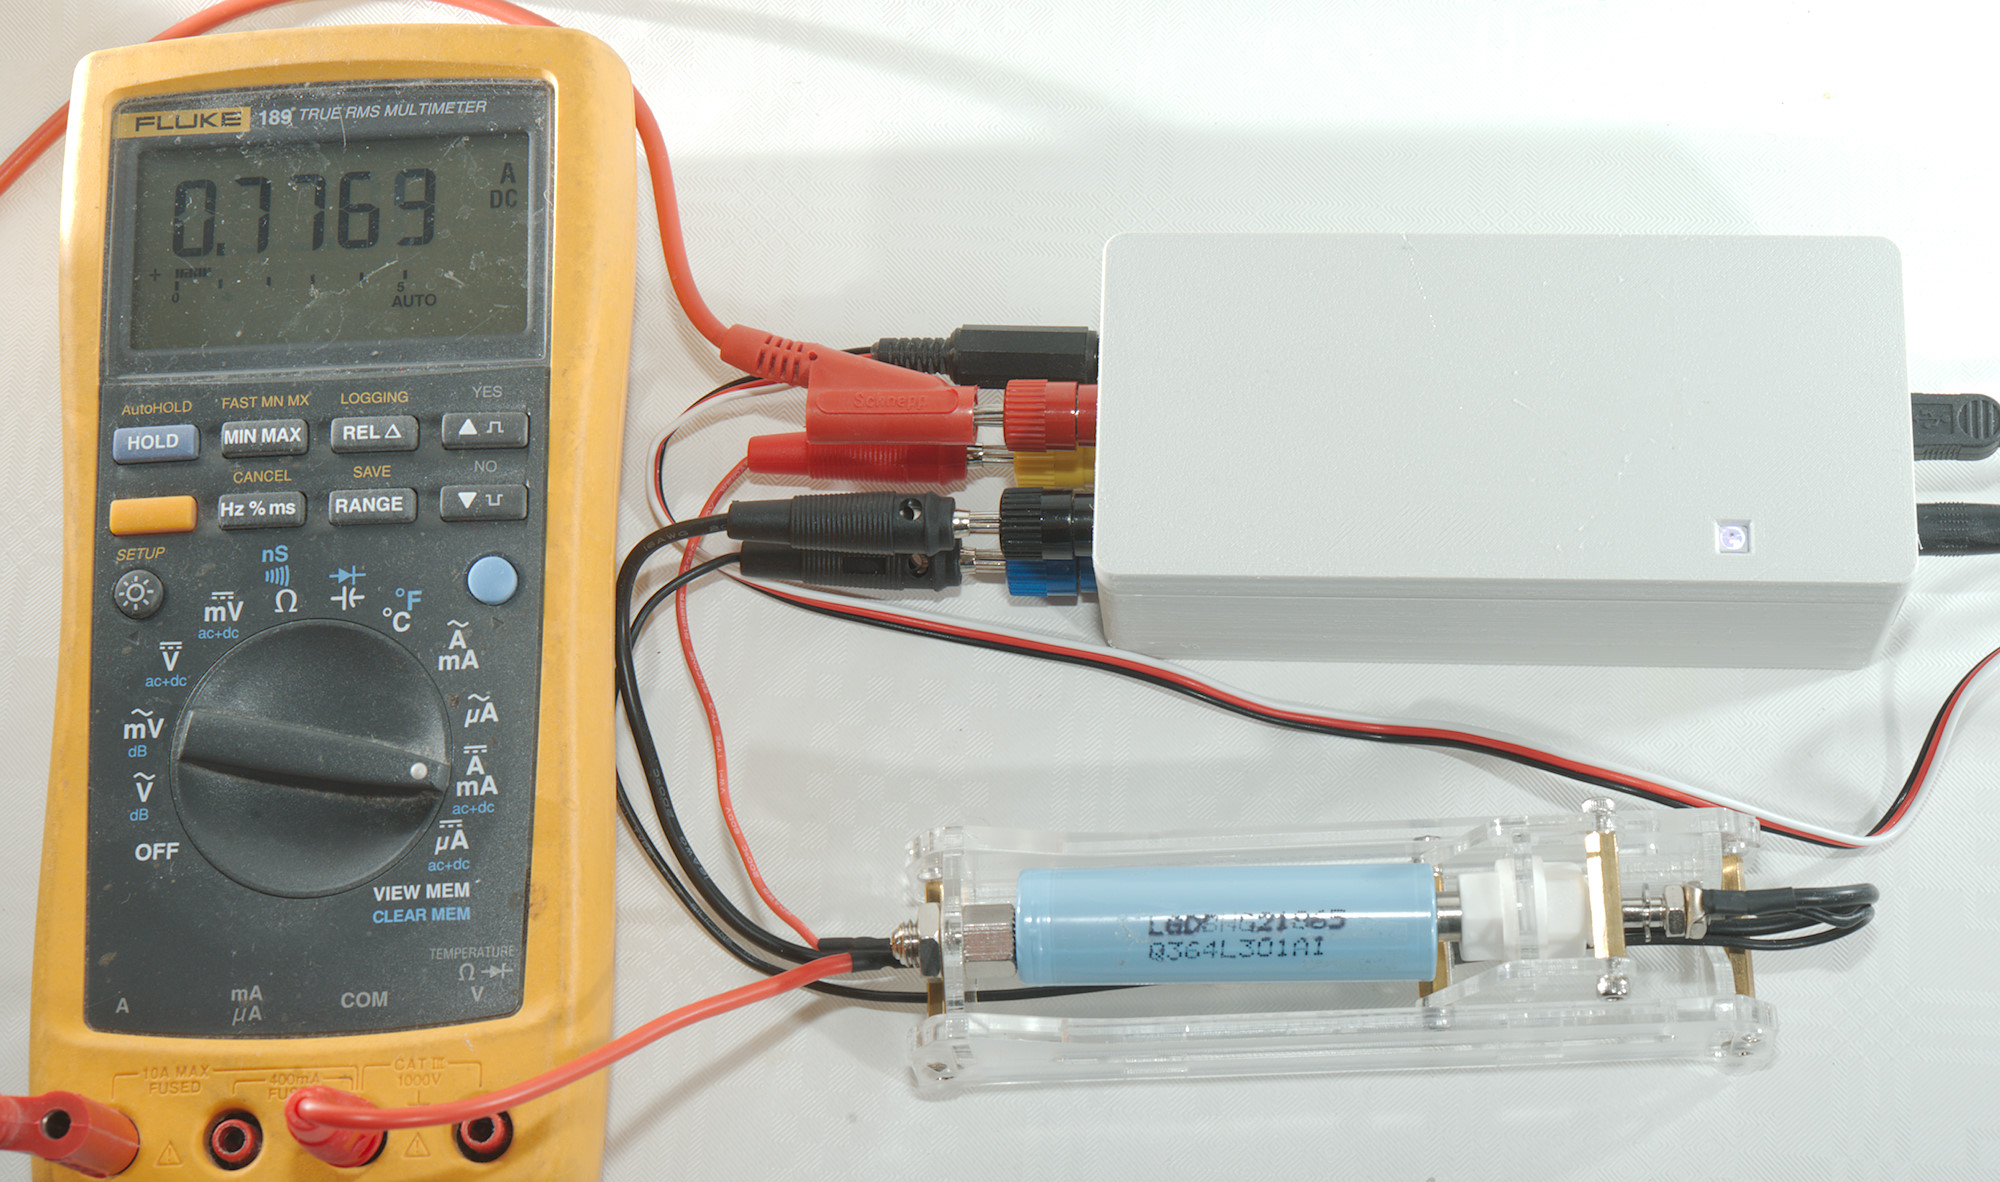
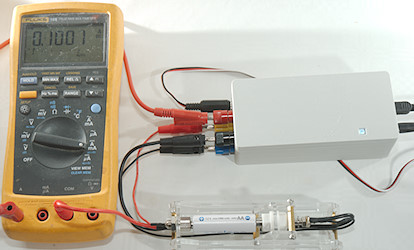
Move the current wire the the A input on the meter and press the high current button or write "calStart I2" in a terminal. The current will be around 0.8A and need a couple of minutes to stabilize.
Again enter the value in the program and press "Enter value" or write "cal 0.7769" in a terminal.
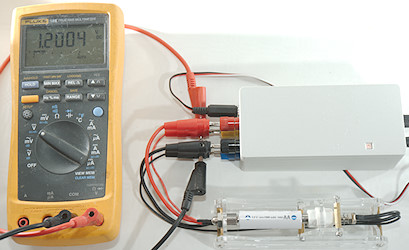
Next up is voltage, first the low voltage where the empty NiMH battery is used. The multimeter must be change to measure voltage (Remember to move probe terminals on the meter) and then connected across the battery.
Press the low voltage button and enter the voltage or use "calStart V1" and "cal 1.2004" on a terminal.
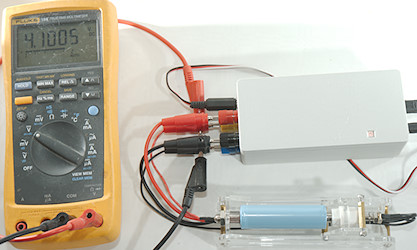
For the high voltage use the full LiIon battery and same procedure:
Press the high voltage button and enter the voltage or use "calStart V2" and "cal 4.10005" on a terminal.
Now press end calibration or write "stop" on a terminal.

The calibration is not saved yet and will disappear next time the Arduino processor is reset. Press SaveConfig to store it permanently or write "saveConfig" on a terminal.
On a terminal all the calibration values can be listed with "calAll?" at any time.
I obvious made a mistake during calibration and forgot to save the low voltage value and a older calibration value is shown. This do not make the calibration completely invalid, as long as the old value is correct.

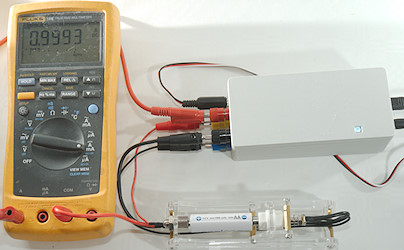
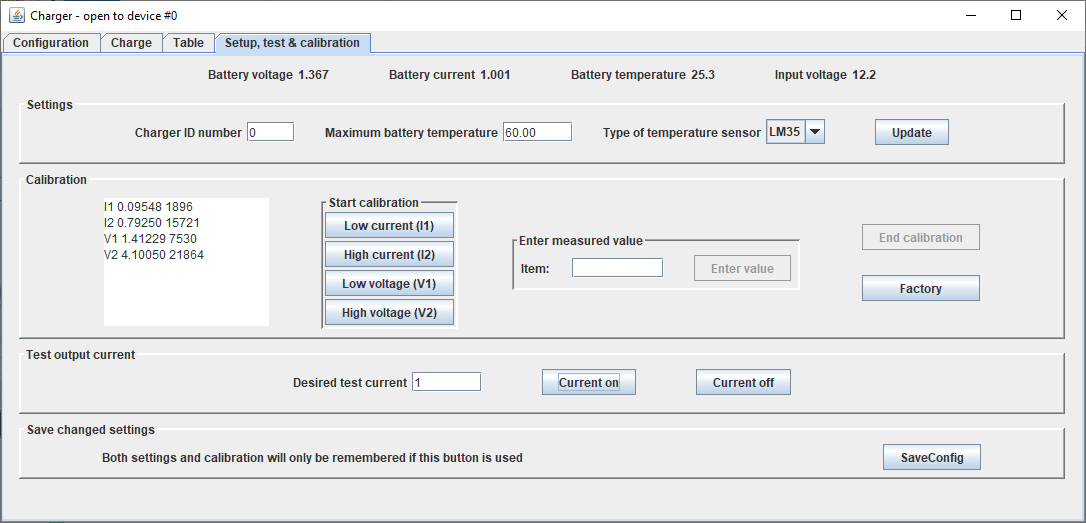
Rewire for current measurement, either the NiMH or the empty LiIon battery can be used.
Now test with a few different currents. The meter will not show a stable value, but a value that varies slightly around the specified current.
Conclusion
For me this charger is very useful, both for testing and comparing charge algorithms and for using together with a discharge to test batteries.
Notes and download
Gerber files
KiCad project
Arduino program
STL files for enclosure
Java PC program