Test controller, commands page

Commandss

This is the initial page when starting the software, it is the main control center for configuring devices, controlling scripts and logging.

Contents
    What is on the screen
    Pages
    Log & program editor window
        Layout script
        Setup script
    Selected device
    Command line
        SCPI commands
        System commands
        Calculations
    Help window
    General control buttons
        Run
        Load and run
        Save
        Clean & Clear
        Abort
        Log
        Outputs off
    Popup button
    Device buttons
        Mode
        Setup
        Other
Main page


What is on the screen

CommandsExplain

In the above picture I have labelled the different areas of this page, in the following I will go more into details about each area. There are functions hidden everywhere.


Pages

Pages2

This is used to select different pages, many of them will present the data read from the devices, other is used for different types of configuration for TestController.

Pages1

When starting the program not all pages are accessible, this is because they are for presenting logged data and no logged data are present when starting TestController. Either some data must be logged or loaded on the Table page, then all the pages will be enabled.


Log & program editor window

LogWindow

This window will show information, this is found devices when connecting, it is a log of commands issues from the command line and answers from devices, output from other parts of the program and it is possible to edit in the window.

All output will start with two semicolons ;;, this allows the program to remove them. This is useful if the commands must be reissued. Pressing the "Run" button will do that. The commands can also be saved with the "Save" button, again the lines starting with ;; will be removed first.
When writing scripts use a single ; for comments and they will not be removed.
If the cursor is placed at the bottom of the log windows data, it will scroll when new data arrives.

LogWindow2

Another way to reuse commands is to store them as a hot key, mark one or more command and right click to do that. Hot keys are automatic saved and will also work next time the program is started. Pressing a hot key will perform the assigned commands directly through the command processor, they are not typed on the command line, but will be shown in the log window.

TCLayout

The popup menu has a option to generate scripts.


Layout script
To make a layout script first open all the desired popups and place everything on the screen as desired. The select one of the "Generate Script, Layout" options to generate the actual script.
The generated script will recreate the same layout again.
A layout script contains loaded devices, math channels, scales and popups. It is possible to edit it and only use some part of it. Missing devices will not be loaded and Mode/Setup for them will not be shown (Some serial port devices are assumed to be present if the serial port exist).
When saving a generated script to menu it is possible to use ; for submenus.
The script files are saved in ...\Documents\TestController\ScriptLibrary and can be edited, but that will first be used from next restart of TestController.

TCBeforeLayout

Before a layout script is run.

TCAfterLayout

After the layout script is run (A right click and a left click).

TCAfterLayoutAligned

Using the #alignGrid command before saving the layout can get a pixel perfect placement.


Setup script

When using the Mode and Setup popups to control devices all the used commands are recorded in a list, use the "Generate Script, Mode & Setup" to convert that list into a script that will automatic do the configuration.
It is possible to edit in the generated script.
A script saved as menu may look like this:
Code:
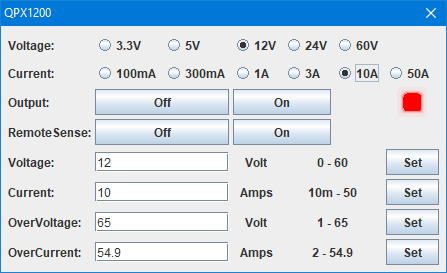
#scriptMenu test
#autorun
#scriptHandles K34470 KEL103 QPX1200
QPX1200:V1 24.0
QPX1200:OP1 1
QPX1200:I1 10.0
QPX1200:TRIPRST
QPX1200:*cls
QPX1200:OP1 1
KEL103::curr 3.0A
K34470:abort
K34470:*cls
K34470:conf:volt:dc
K34470:[*OPC]
#InitColumns
#SyncPopups
#clear 1
The #scriptMenu defines the menu title of the script, use ; between items to get submenus.
The #autorun means the script will run directly when selected, if removed the script will be loaded into the log window.
The #scriptHandles is a filter, i.e. this script will only be shown in the popupmenu when the 3 listed handles are present (The script would not work without these devices loaded).
The #InitColumns forces a check of current mode on all devices with mode selection.
The #SyncPopups will secure that all open popups reflect the current state of the devices.


Selected device

SelectedDevice1

Each loaded device is assigned a handle that is used as label and when accessing it. The handle for the currently selected device is shown here. SCPI Commands on the command line goes to this device as default.

There are two ways to change the selected device:

SelectedDevice2

Right clicking on the area will show a list of currently loaded devices and a new one can be selected.

SelectedDevice3

Typing the handle followed by a colon on the command line will select that device.

After loading devices the handle will always point to a valid device.


Command line

CommandLine1

The command line is one way to control devices and activate functions, but most can be done without using it.
The command line handles 3 groups of commands: It is also possible to change the selected device by writing the handle followed by a :, this can be placed before a SCPI command, then the command will go to that device and the selected device will change.

CommandLine2

Pressing INS or right clicking the mouse will show possible commands for system commands and some devices. It is possible to select one and press Enter. If there is only one possibility it will directly be entered on the command line, without waiting for Enter.

The command line has a history buffer, it can be access with up/down arrows and it can be searched by type part of a old command and then using Shift up/down arrow. A search term will be active until the command line is modified.
Down is from oldest entry, up is from newest entry in the history.


SCPI commands

All SCPI devices have their own set of SCPI commands and they can be typed here (In many cases the Mode and Setup buttons are easier ways to do it).
For non-SCPI devices there will be a simplified SCPI drive in TestController, it will process the command and translate it to something the device understands. These commands are nearly always documented in the help window below the command line.

The typed commands will mostly be transmitted literally to the connected SCPI device (or driver), but it is possible to use parentheses () to invoke the calculator. I.e. "xxx (2*5)" will be translated to "xxx 10" before being transmitted. The expressions in the brackets can contain function calls and variables.

After using a #calc command these command will go to the calculations until the next # is encountered.


System commands

These commands all starts with a # sign, there is a variety of commands, see the help window for specific documentation (Type a # sign at the start of the command line).

This group also contains script constructs (Conditional, loops and delays), these will be ignore when given from the command line.
Some of these commands may require the device handle as parameter, using Ctrl-INS will insert the handle for the currently selected device.

The number of parameters is important for these command because the function varies with the number of parameters. Spaces are used as delimiter between parameters, but it is possible to include a space in a parameter by using quotes around it, i.e. "a a" is one parameter.
Using parentheses around a parameter will usually invoke the calculator for that parameter.


Calculations

Starting the command line with a = sign will pass the rest of the line to the calculators. It works in a similar way to the calculator window, but there is one significant difference: Before calculating an expression all devices are enquired for there current value and variables are created (Same name as used on "Current values" page). These can be used in the expression.

The result from the expression is shown in the default format, that may be decimal number, integer or string format, depending on the result, this is similar to the Str format in the calculator.


Help window

HelpWindow

The help window will show help for the command line, it has help for all commands that starts with # and for most non-SCPI devices. It can also show help for SCPI devices, but I have not made any help files for them.
Help files are not included with the software, but is downloaded from my web server, when a help file has been used once a local backup will be create and used if the computer is offline.

HelpWindow2 HelpWindow3

The help text is dynamically adjusted when typing on the command line. Double clicking a command in the help window will copy the command to the command line.


General control buttons

ButtonsControl

These buttons is for general control, that is running scripts, saving/cleaning the log window, logging data and shut everything off.


Run

ButtonRun

This button will use the commands in the log window as a program and run them. When running scripts it is possible to use loops, conditional and waits.

buttonRestore

In many cases it will change to a Restore button when doing this. Pressing this button will restore the log window to the contents from before run was pressed. Using Clean or Clear will cancel the restore and change the button to Run again.


Load and run

ButtonLoadAndRun

Load a file and optionally run it as a program. This can be used to configure TestController for a specific task and/or to control a test.
Usually the file is loaded into the log window, but if it start with "#autorun" it is not loaded into the log window, but is directly run and the output will be shown in the log window.


Save

ButtonSave

Save the log window. This can save in 3 different formats:
ButtonSaveMenu


Clean & Clear

ButtonClearClean

The clean function removes any lines starting with ;; this means any output of commands, but not the commands.
The clear function clears the log window for any contents.


Abort

ButtonAbort

When a program is running the abort button is red and pressing it will cancel the program.


Log

ButtonLog

Start logging data to the table, this will also enable Chart, Histogram and Range pages. Each time a logging is started it will clear the table and start a new data set. To save a data set it must be saved from the Table page before a new log is started.
The "Direct to disk" option will open a window where the time interval can be typed and a save file selected. While saving to disk the table is still updated with the same data. When logging for a long time a memory optimizer will kick in and remove some samples from the table (The table will contain between 10000 and 30000 samples), this will not affect the logging to disk.

ButtonLog2

When pressing the button a menu of time intervals is shown, usually "1 sec" is a good value (Not all devices will work at the faster rates).
TestController will reduce the logging speed if the devices has problems keeping up.

ButtonLog3

While logging the button is used to stop logging again.


Outputs off

ButtonOff

This button is a fast way to stop all devices. It will not affect logging, but will stop running programs.
The stop means:


Popup button

ButtonPopup

This button hides a menu to control a variety of popups and functions related to popups. When right clicking on the button all Mode and Setup popups are brought to the front.

ButtonPopup2

Here is the menu, the 3 first entries is for opening the Mode & Setup menus for all loaded devices at once.
It is also possible to lock or unlock a "on top" state that forces the windows to always be in front.

In addition there are a couple of popups with other functions:


Device buttons

DeviceButtons2

These buttons control the selected device (I.e. the device shown in front of the command line). These buttons are only available if they are defined in the device definition.


Mode

ButtonMode

This button is typically used on bench multimeters to change mode. It can only be used when not logging.
The popup shown will depend on the actual meters and how it is defined.


Setup

ButtonSetup1 ButtonSetup2

This popup is for configuring devices, it is defined in the definition file. There are very large variations on the look of this popup.
The general idea is that this popup, at least, covers the most common configurations on the device.
These settings can be used while logging.


Other

ButtonOtherMenu ButtonOtherMenu2 ButtonOtherMenu3

When visible this button will show a menu with some download or screen dump functions. These functions will be performed in the background and may take minutes for each of them (Depending on the amount of data).