Led4power 5A linear driver LD-1 (prototype)
This driver is a prototype version and during the test I got an update to it.
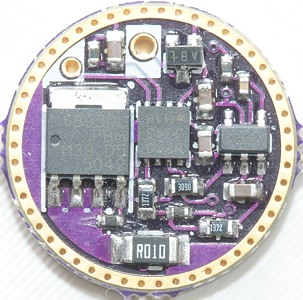
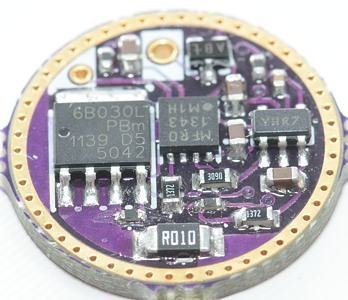
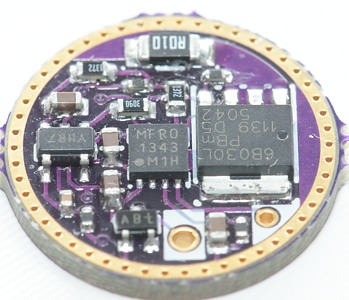
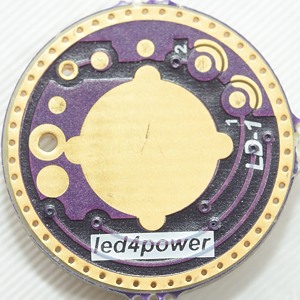
Official specifications:
- Input voltage 2.8-4.35V
- 5 Amperes(default) current
- off-time mode memory
- no components on spring PCB side!
- place for decent size (up to 8mm bottom diameter) spring on spring side pcb
- PWM-less TRUE CONSTANT CURRENT on all modes-no acustical or EMI noise
- significantly longer run-times on lower modes compared to PWM-based(FET or AMCs) drivers-even >2x possible
- stays in regulation on lower modes for longer periods of time compared to PWM-based(FET or AMCs) drivers
- 6mohm power mosfet
- pmos reverse polarity protection
- calibrated voltage reference
- less than 100uA parasitic current in sleep mode (40uA typ.)
- enough space for easy led wires soldering(up to 20AWG,22AWG recommended)
- 2.6mm total thickness(including 1.6mm PCB),16.9mm diameter
- simple, intuitive UI, no disco modes
- modes: 0.3%-1.5%-20%-100%,standard half press to increase mode
- 0.3% disable via solder "moon" 1 (no solder mess on gnd ring anymore)
- "turbo" mode option (140%@4.2V,drops linearly to 110%@2.8V),turbo enable via solder moon 2
- tailcap switch and electronic side switch capable, independently or both at the same time with single firmware!
- three separated e-switch user interface types(rather than one complicated)
- 2-step low voltage protection(3V-restricted power; 2.8V-sleep)
- over-temperature protection (threshold change possible by user)-disabled by default
For a full description of the driver see: BudgetLightForum
After the test, led4power did a modification to the driver, I have done a few measurements on the updated driver
Measurements
Tested with: Cree XM-L2, 3xCree XP-G2 and Luminus SST50.
Diameter: 17mm
Max. height: 2.8mm (May change in the final version)
Can be used with power switch alone or a mode switch can be connection for more possibilities.
With power switch: 3-5 brightness settings, remembers last mode.
With separate mode switch: 3 different UI's:
UI1: 3-5 brightness settings, always starts from low.
UI2: Ramping
UI3: Simple on/off, use double click to change brightness.
Standby current at 3.6 volt is 42uA
When using battery switch it will remember last mode.
It is possible to disable 0.3% mode with soldered link #1.
A "Turbo" mode can be enabled with soldered link #2 (I did not test this mode).
UI and working mode
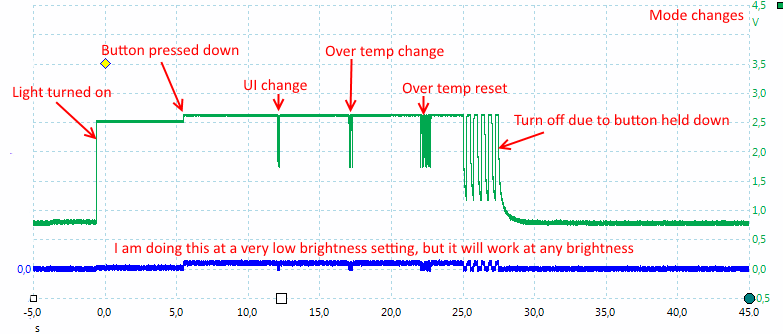
The drive has some modes and settings that can be changed by holding down the mode switch.
UI will be changed after 7 seconds.
Over temperature step down will be changed after 12 seconds.
Over temperature reset to default after 15 seconds.
And if the button is pressed for more than 20 seconds the driver wil shut down.
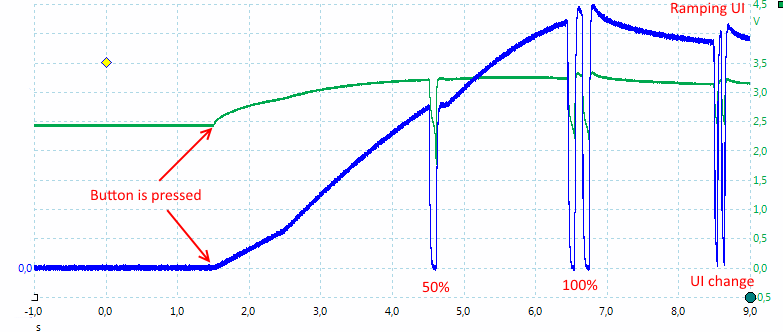
The ramping user interface works with the mode button. First turn the light on the hold the mode button to change brightness.
It is very important to release the button when high is reached, or the light will change UI mode.
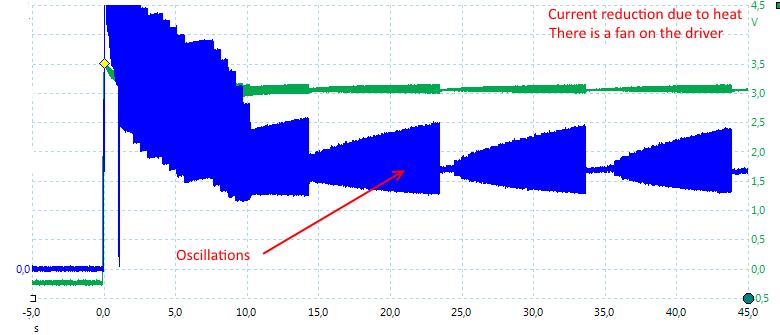
The driver will reduce the current when it gets hot.
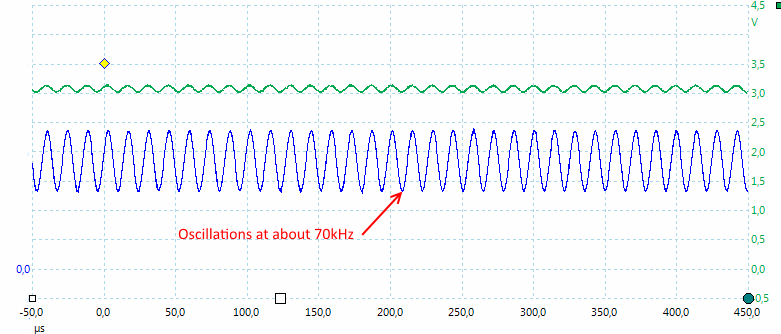
The driver does have some invisible oscillations while doing this (sometimes).
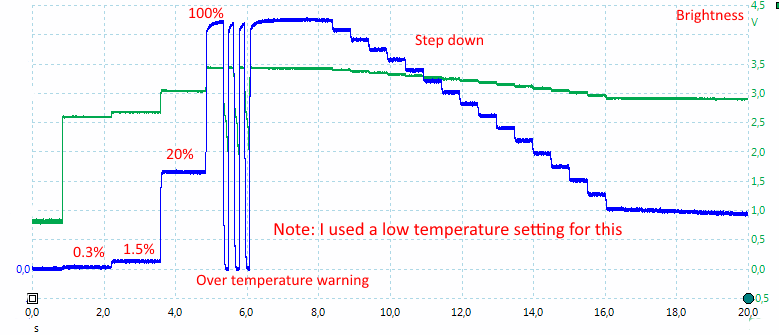
The different brightness settings and a step down without oscillations.
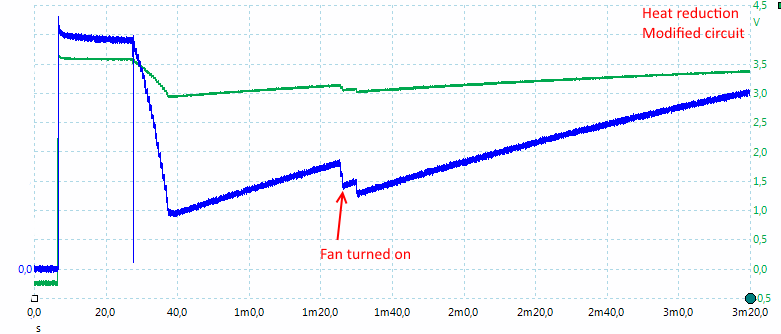
Led4power did not like the oscillations and found a fix. The above curve is done with the fix installed.
There is no trace of any oscillations anymore and the driver is not nearly as sensitive to temperature.
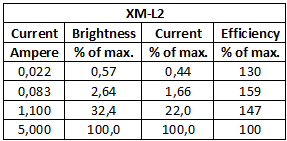
One of the nice features about a linear driver without pwm is the better efficiency of the led. Here I have tried to measure it with a lux meter. First I measured lux at 5A and defined that as 100%, after that I measure lux at the lower settings. With pwm the efficiency of the led would have been exactly the same, because the current is the same, but only applied part of the time. With this driver the current is reduced and the efficiency goes up. At 1A the brightness is supposed to be 20%, the lux is 30% of max, i.e. about 50% more brightness than a pwm driver would have given.
The huge improvement at lower currents is because it is compared to 5A current, if maximum current had been 3A the improvement would have been smaller.
Temperature
Usual I will not do temperature check when testing drivers, because it is difficult to use the camera in my test setup and my cooling does not reflect the working conditions in a flashlight.
But this time I decided to try.
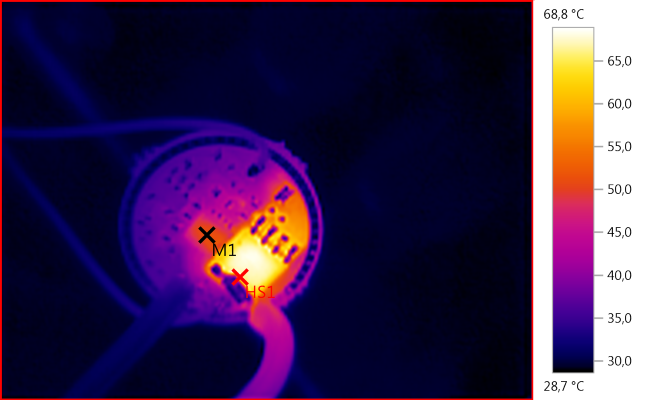
M1: 51,3°C, HS1: 68,8°C
With a 4.35 volt input voltage the power transistor (HS1) get very hot, very fast. This is about 30 seconds after I turned the driver on and the microprocessor (M1) has already limited the current.
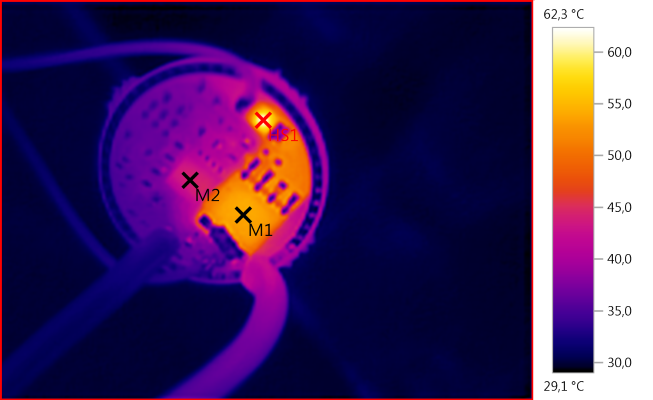
M1: 53,8°C, M2: 44,3°C, HS1: 62,3°C
Reducing the battery voltage to 4 volt fixes the heat problem, this time it is the current sense resistor that gets hottest (But not to hot).
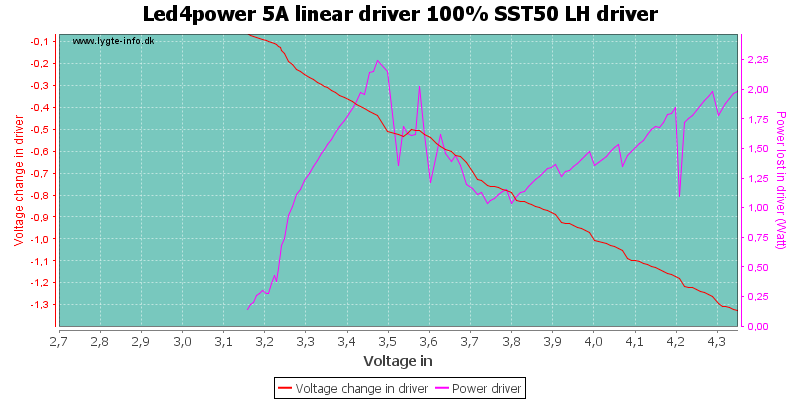
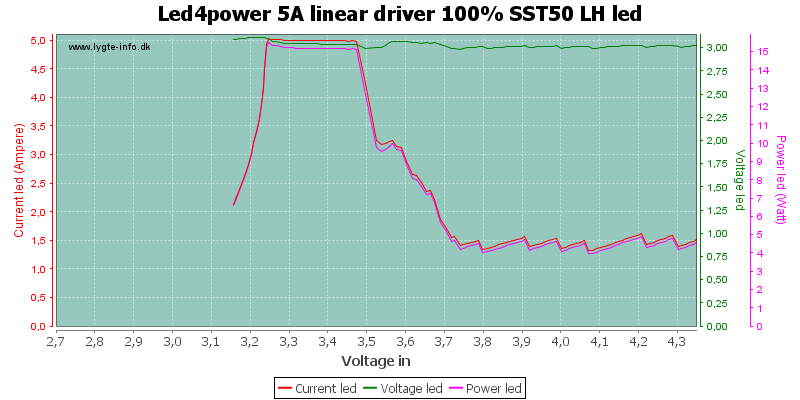
100% SST50
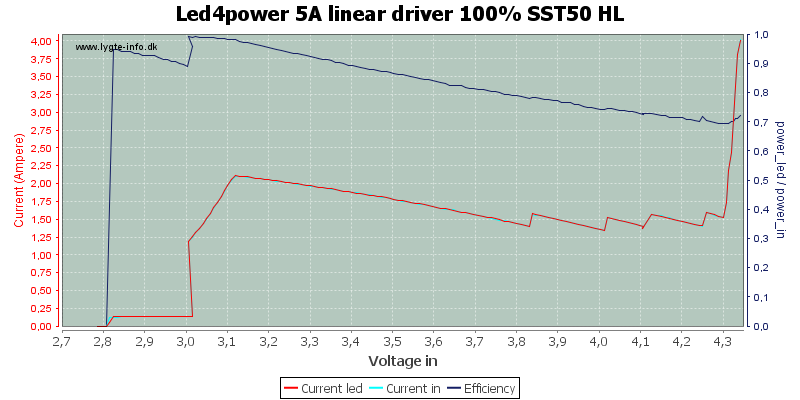
First test at full (normal) power. The driver is supposed to deliver 5A, but that did not last long enough for me to start the test.
The problem is the input voltage and the low Vf of the led, the driver reduces current very fast at high input voltage.
At 3 volt the driver steps the power down and flashes a warning and at 2.8 volt it will turn off.
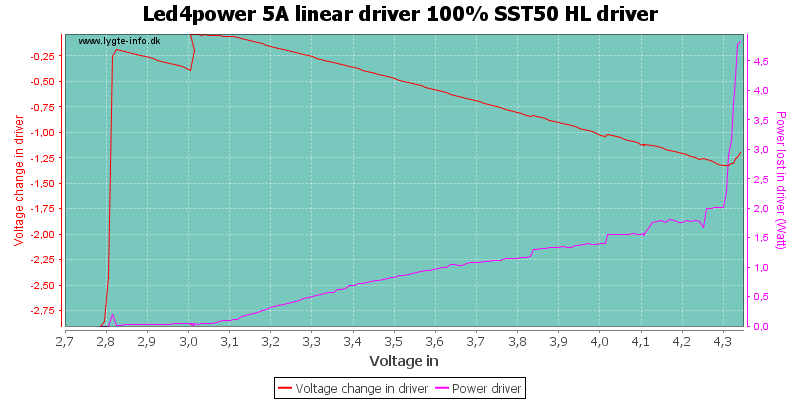
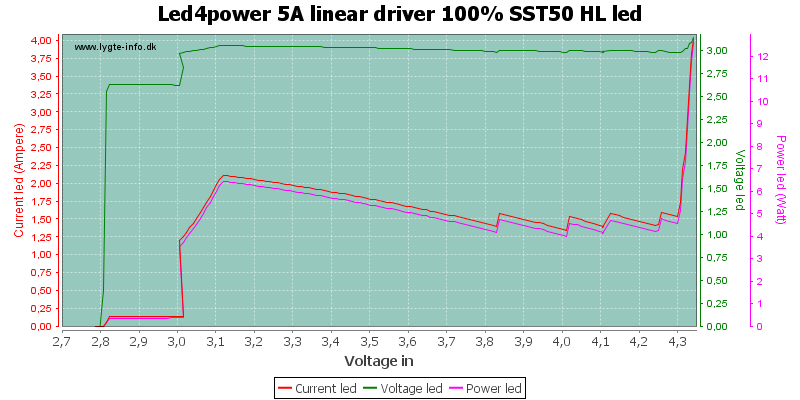
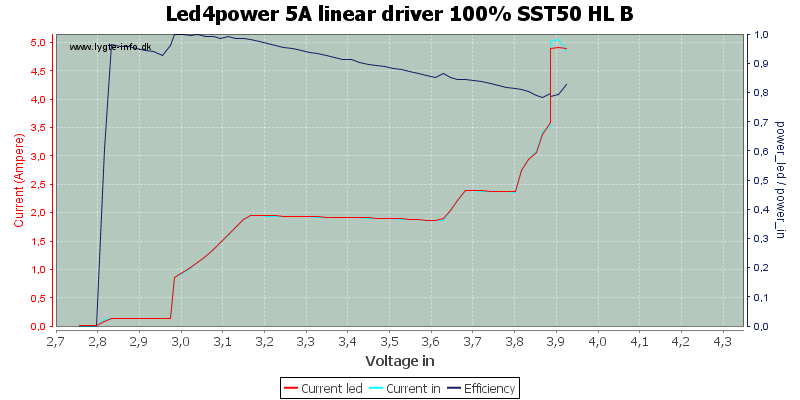
Starting at a lower voltage allows me to see the 5A, but only for a short time.
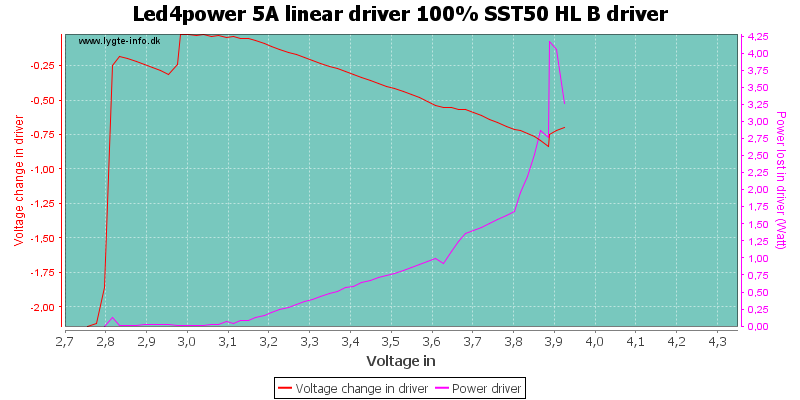
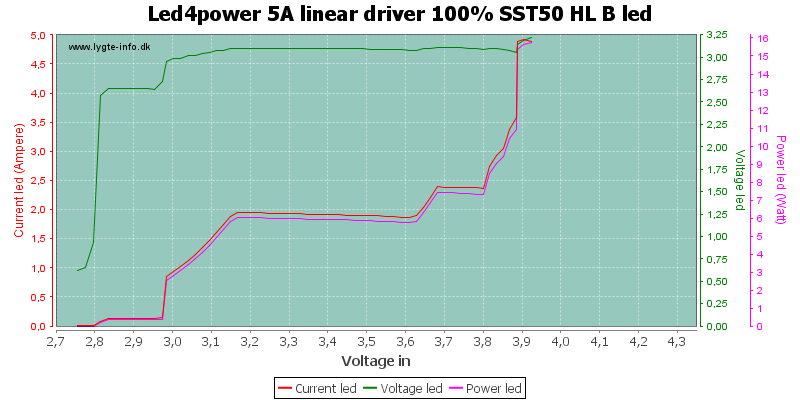
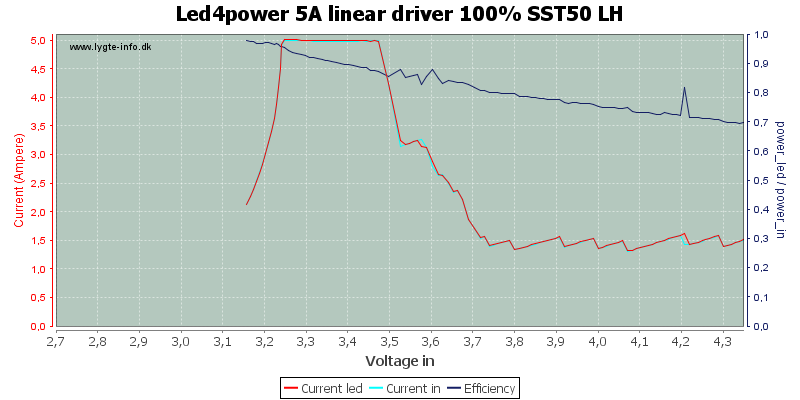
Starting from a lower voltage and working my way up works better. Here I get to 3.5 volt, before the driver gets to hot.
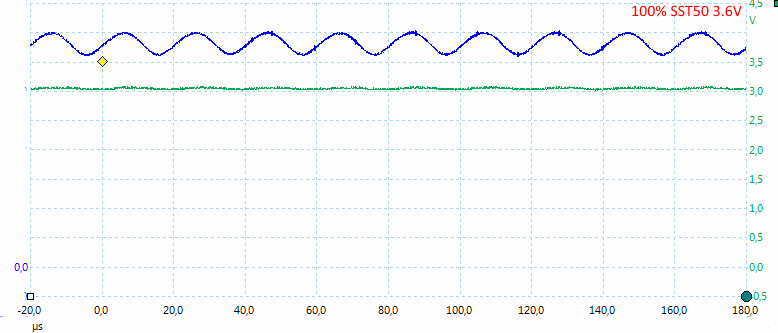
Sometimes the driver has oscillations on high.
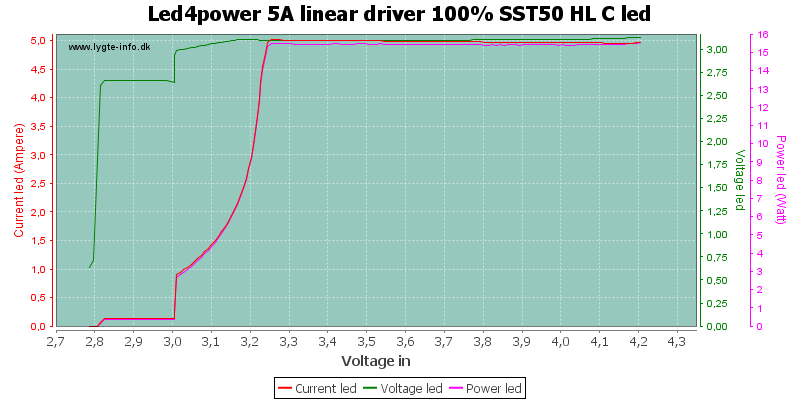
100% SST50 with fix installed
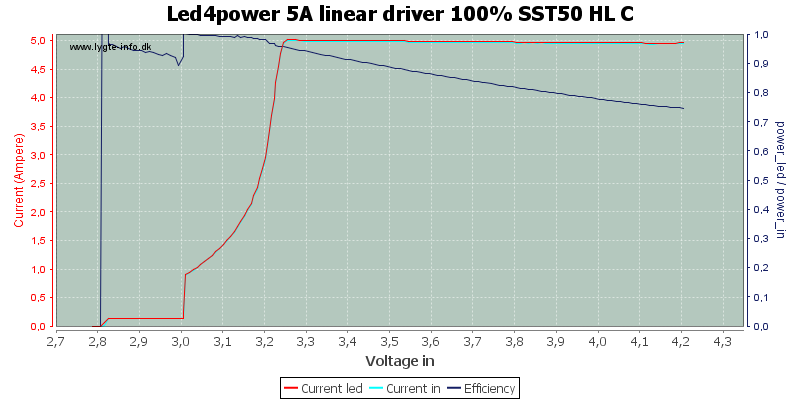
After the fix was installed the driver is much less temperature sensitive, and works fine with the SST50
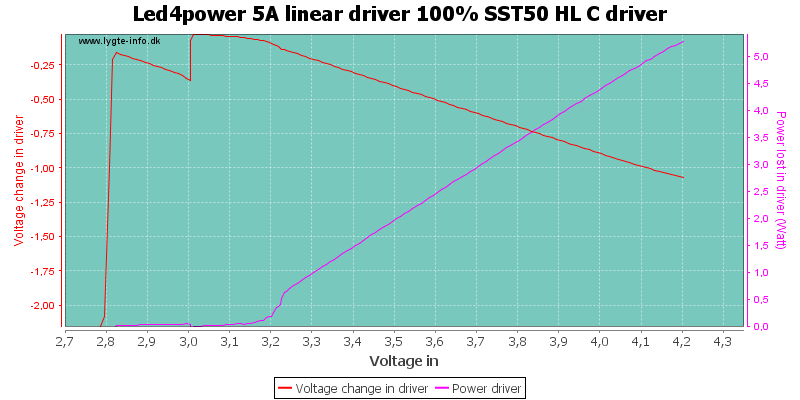
But it does require a lot of cooling, especially if the battery can keep a high voltage at 5A load.
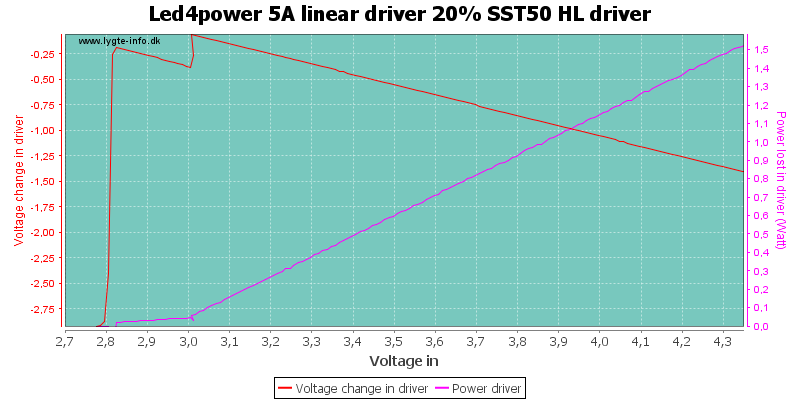
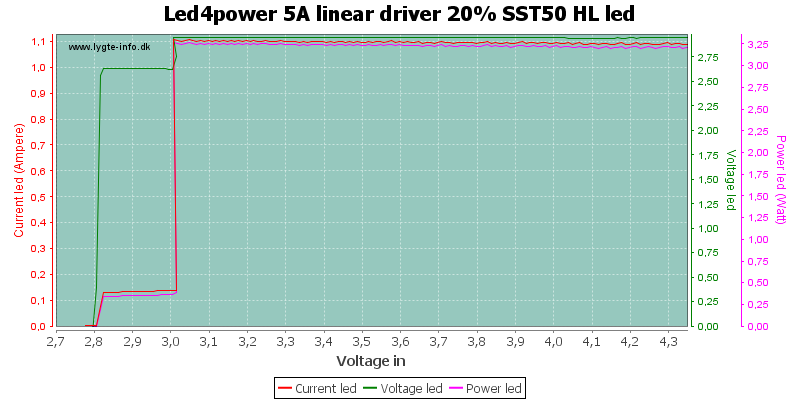
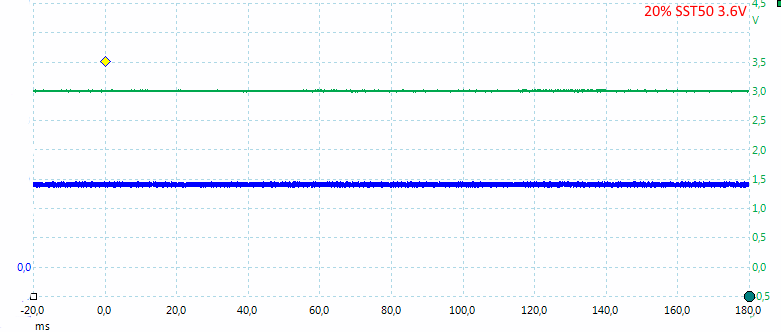
20% SST50
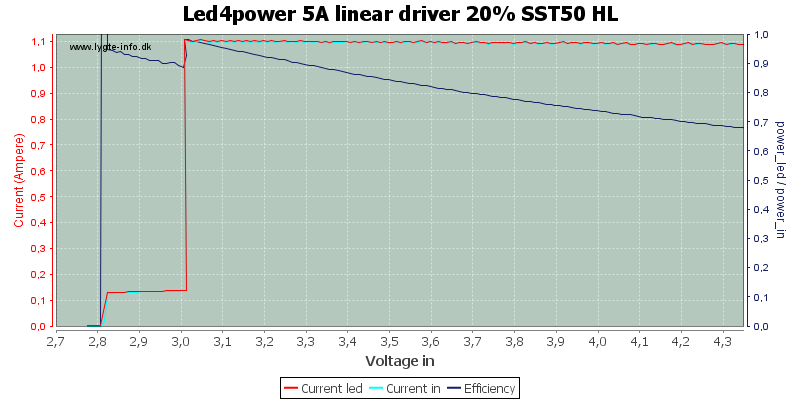
When reducing the power, the driver does not have any heat problems. At 3 volt the driver steps the power down and flashes a warning and at 2.8 volt it will turn off.
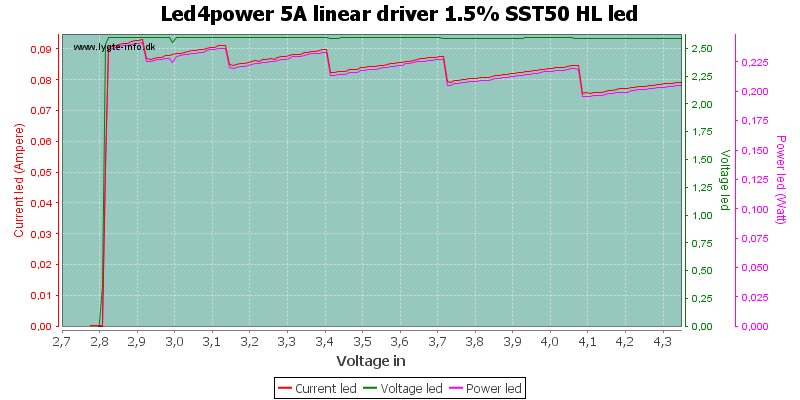
1.5% SST50
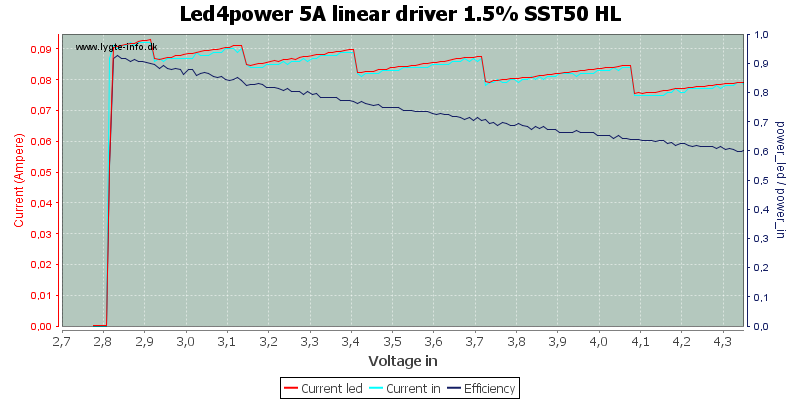
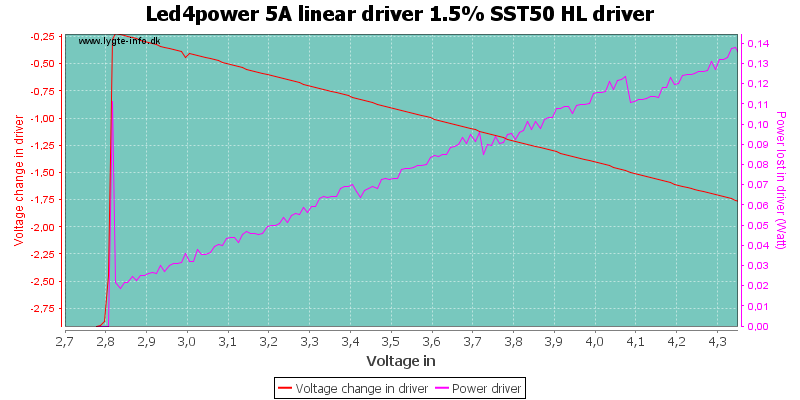
In the low mode the driver is a bit slow to adjust brightness, giving the saw tooth that can be seen in the current.
This is related to the resolution of the AD converter used.
0.3% SST50
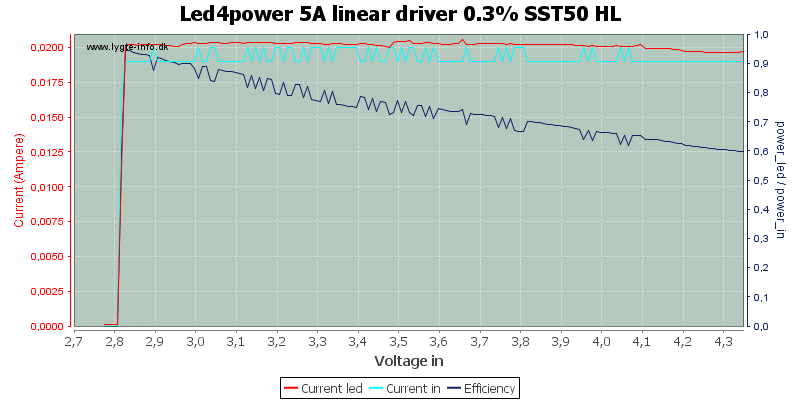
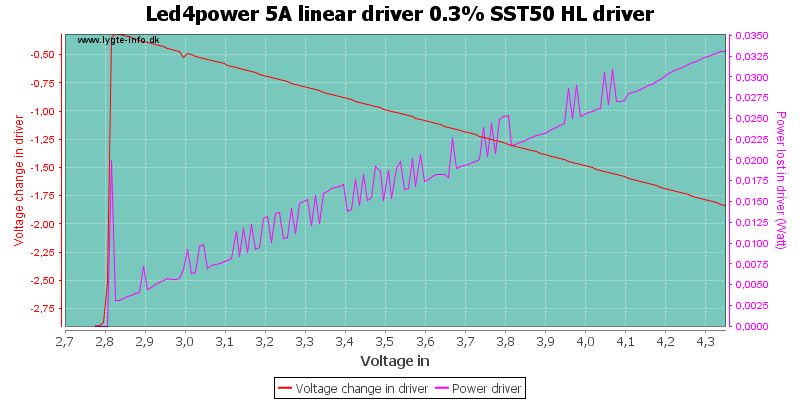
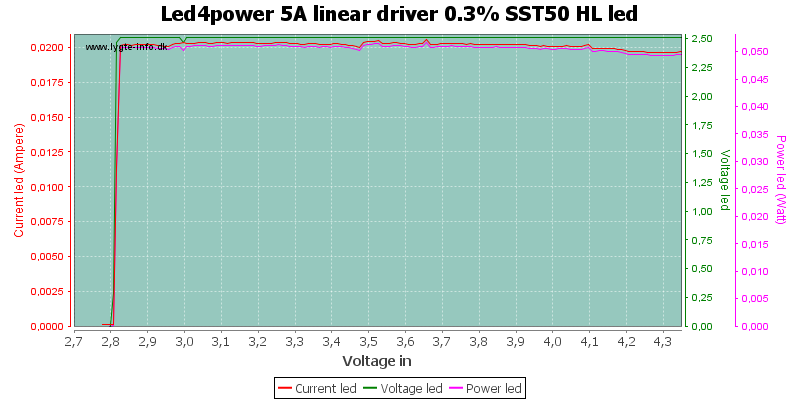
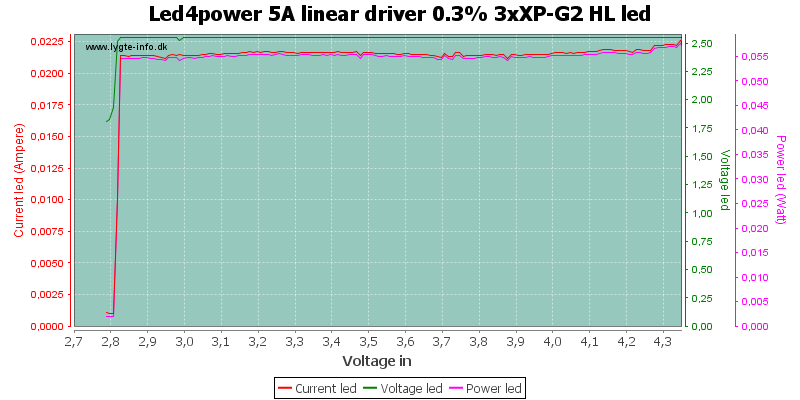
The driver has a stable 0.3% output. The steps in the input current, is due to my equipment, not the driver.
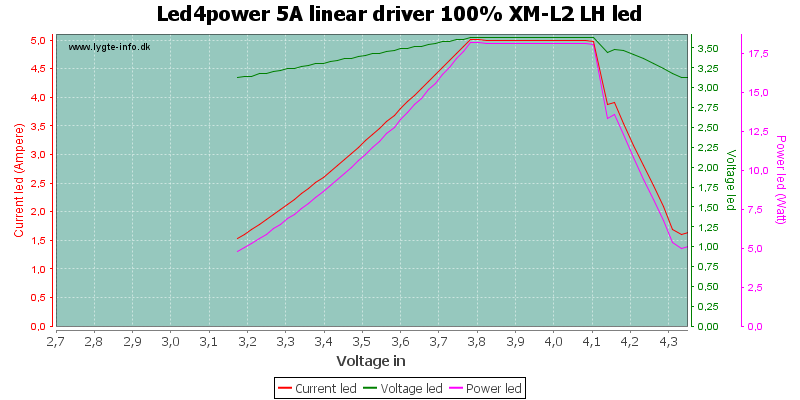
100% XM-L2
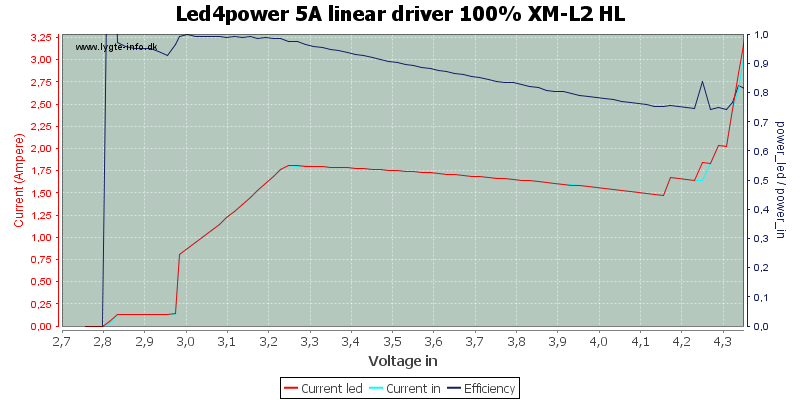
First test at full (normal) power. The driver is supposed to deliver 5A, but they did not last long enough for me to start the test.
The problem is the input voltage, the driver reduces current very fast at high input voltage.
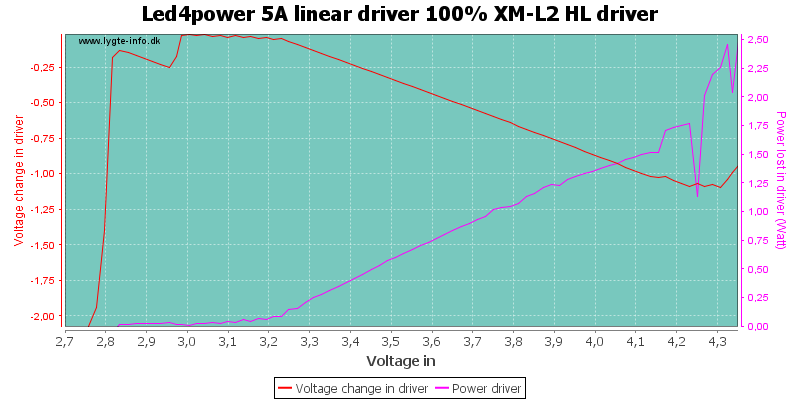
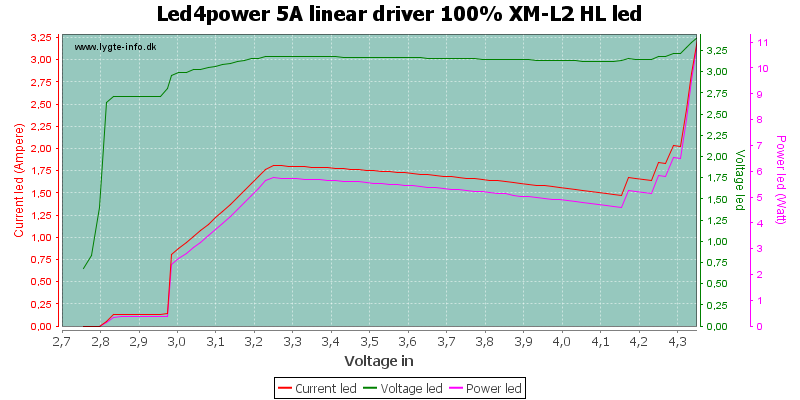
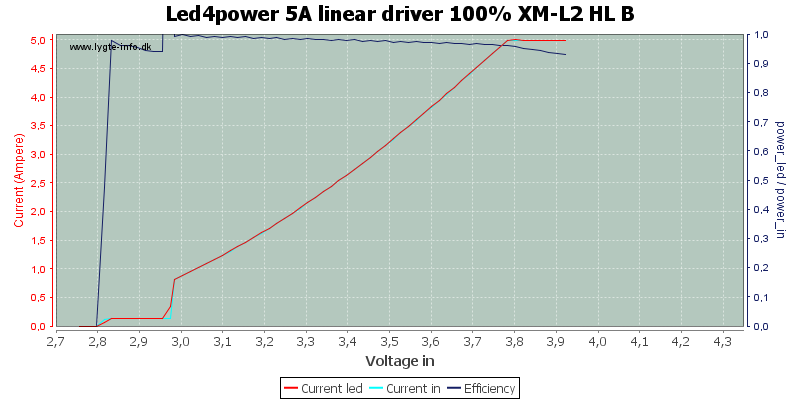
Starting at a lower voltage works much better, this time I do get 5A as long as I have enough voltage for the led.
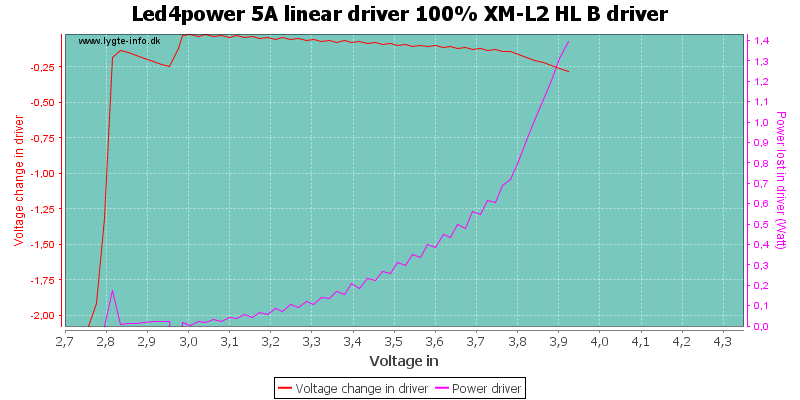
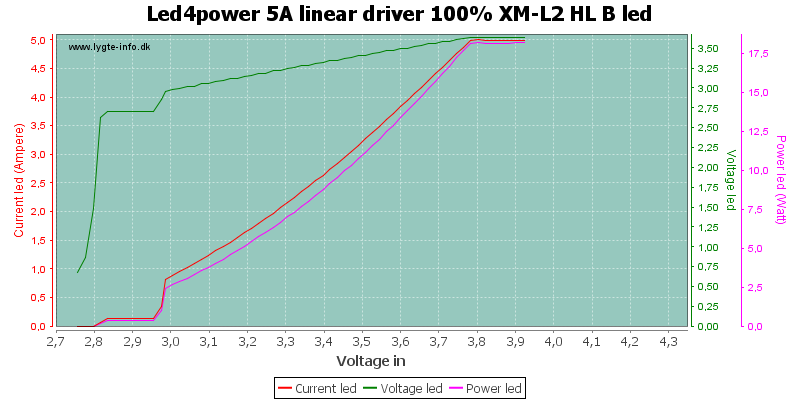
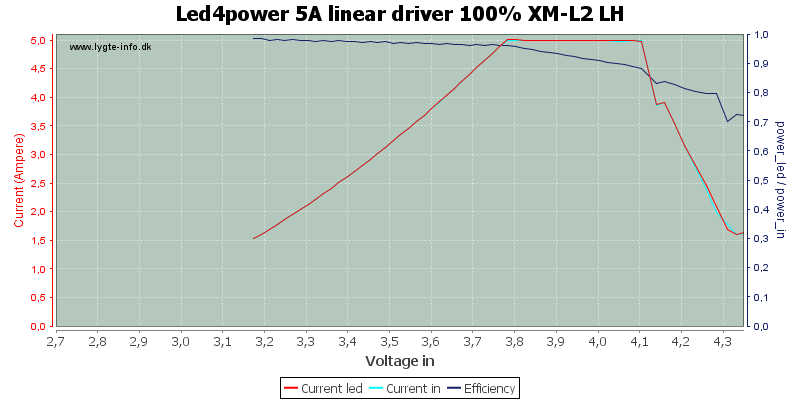
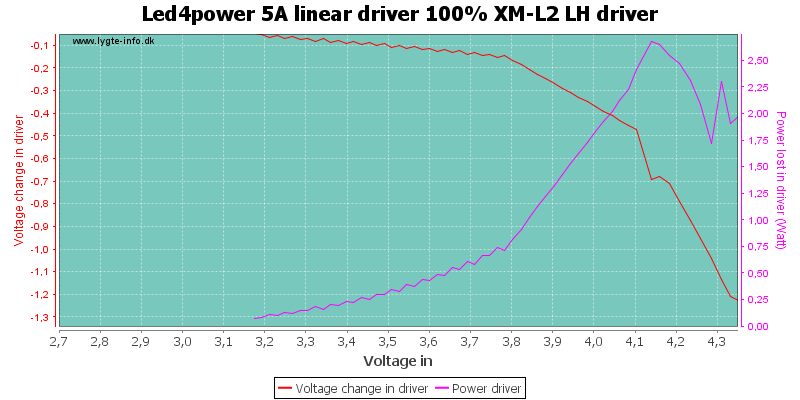
Starting from a lower voltage and working my way up does also work. Here I get to 4.1 volt, before the driver gets too hot.
This will work perfectly with any LiIon cell, they cannot maintain a voltage above 4.1 volt when loaded with 5A, even 4.35V cells.
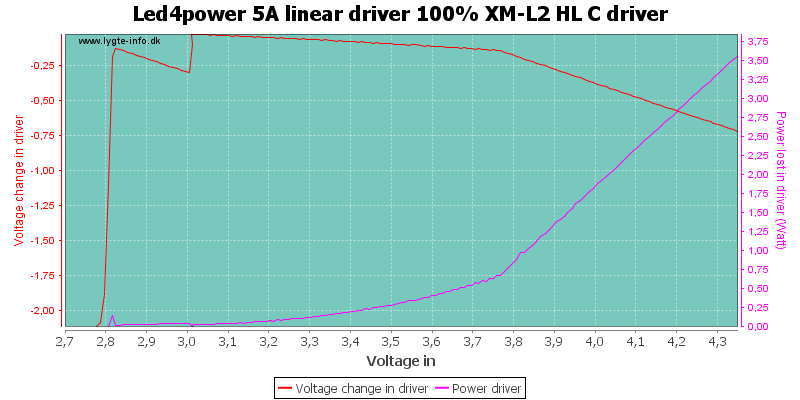
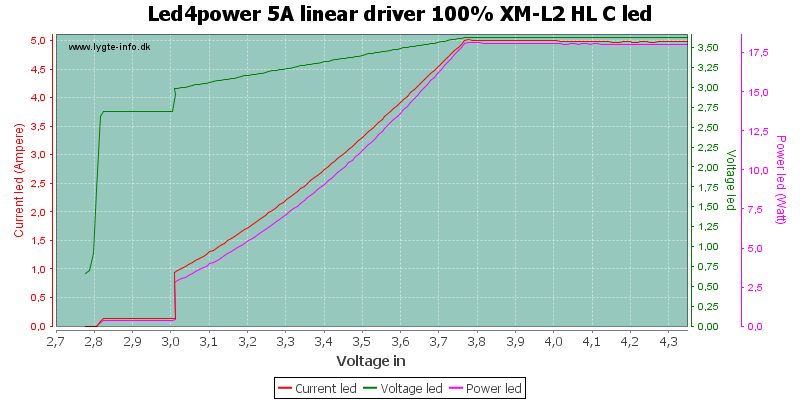
100% XM-L2 with fix installed
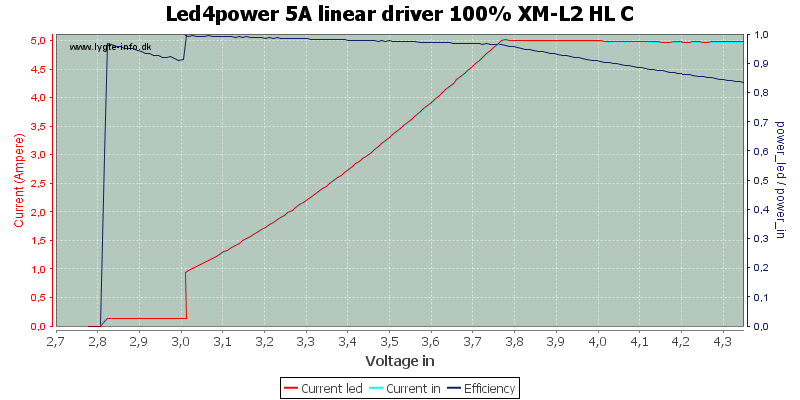
With the fix installed the driver had no problems with the voltage range.
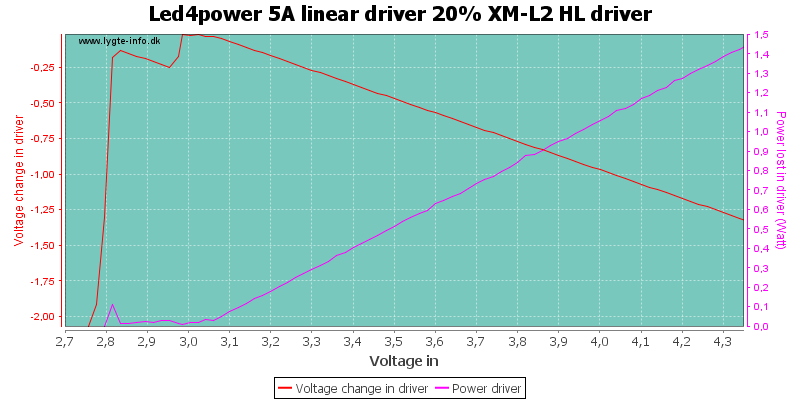
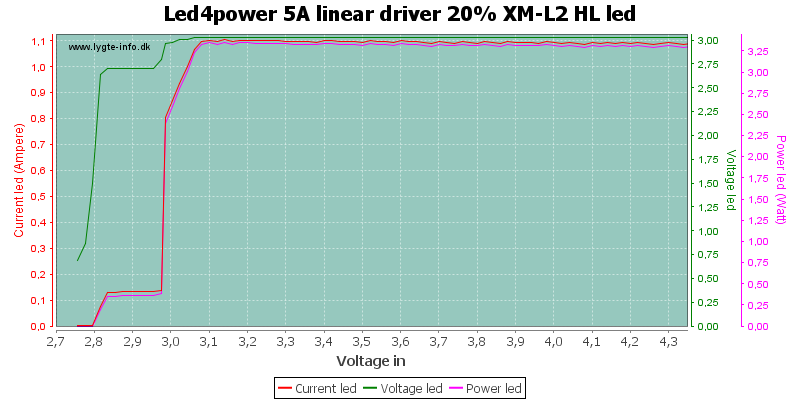
20% XM-L2
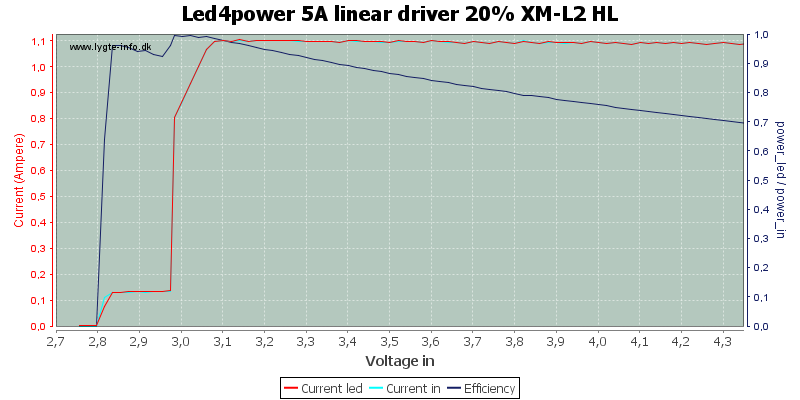
At reduced power the driver has no heat problem and keeps a stable output.
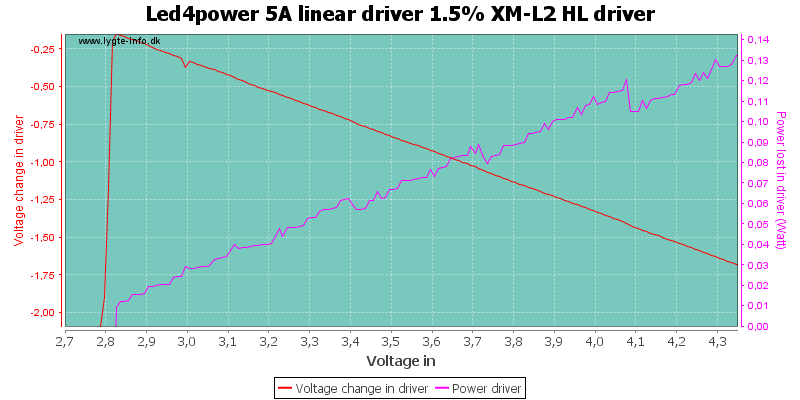
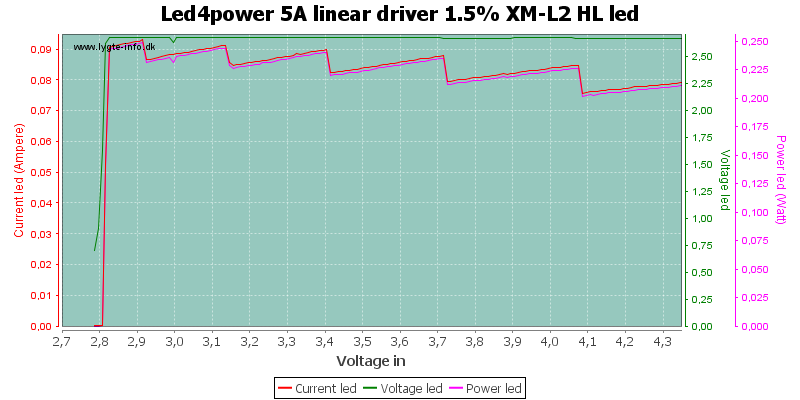
1.5% XM-L2
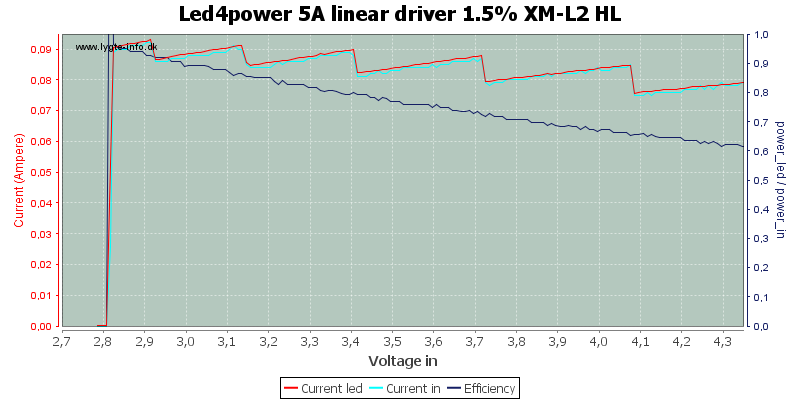
The regulation at low is not completely stable with changing battery voltage. This is related to the resolution of the AD converter used.
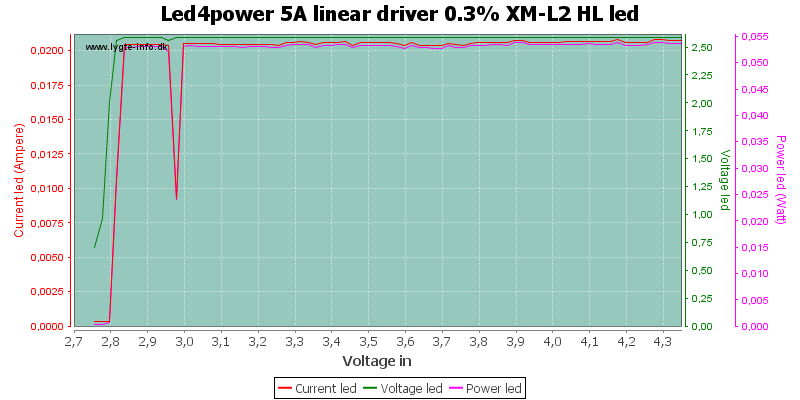
0.3% XM-L2
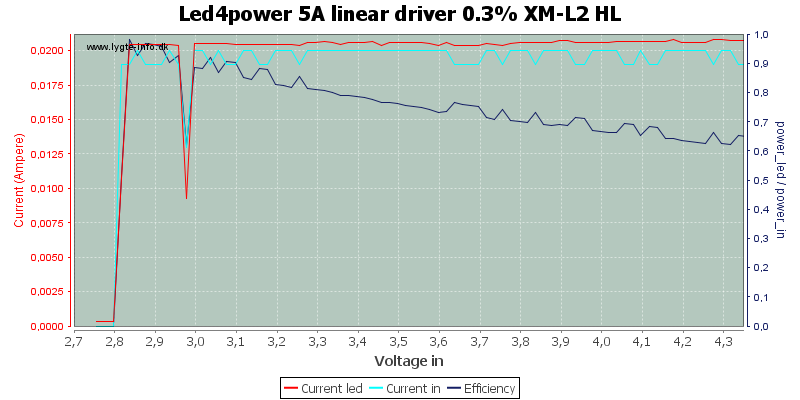
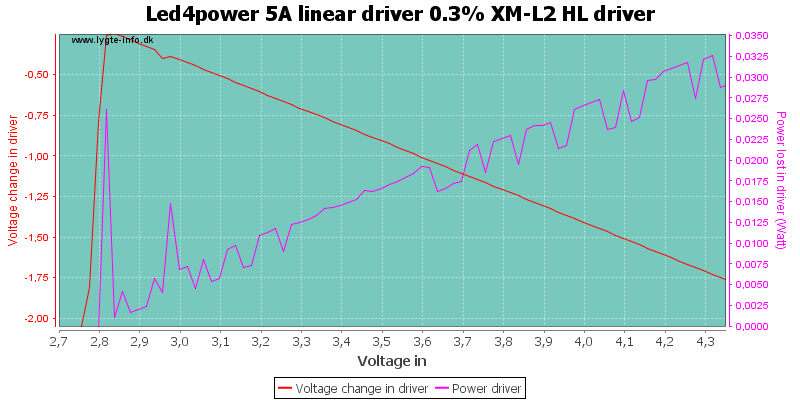
The driver has a stable 0.3% output. The steps in the input current, is due to my equipment, not the driver.
Here I did catch the 3 volt warning flash, but because it is lowest mode there is no step down.
100% 3xXP-G2 with fix installed
After installing the fix I also decided to do a fast check with 3xXP-G2 leds.
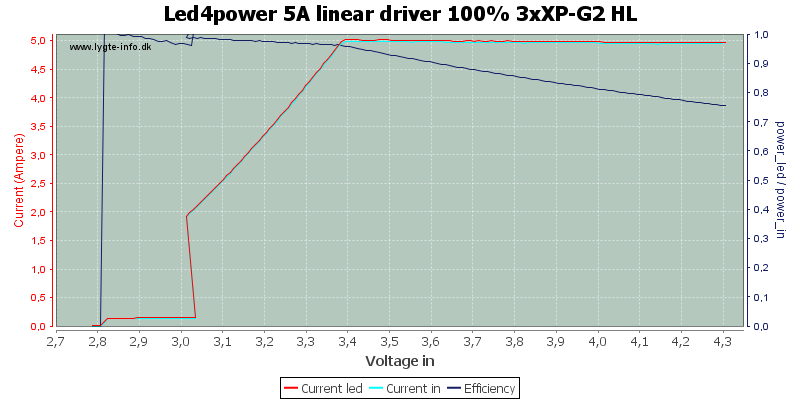
These leds has lower Vf than a single XM-L2, but with enough cooling the driver can handle them.
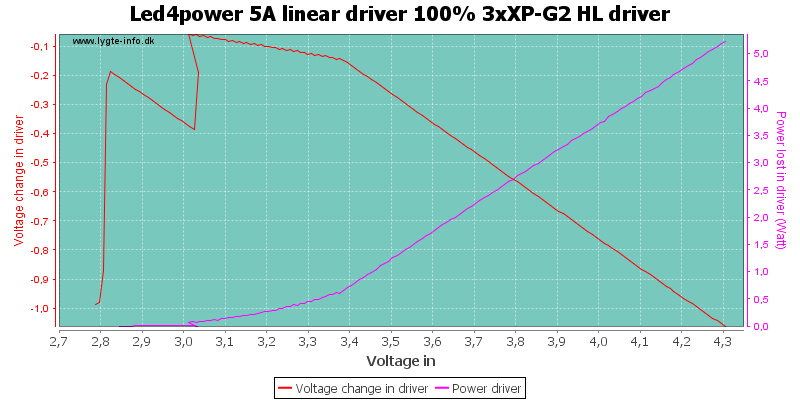
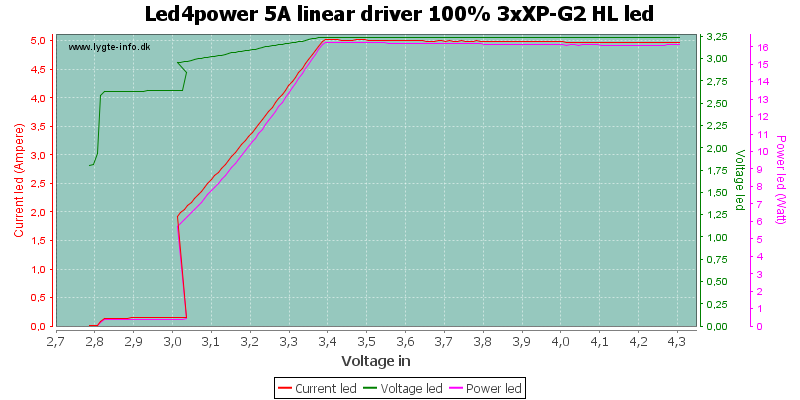
50% 3xXP-G2 with fix installed
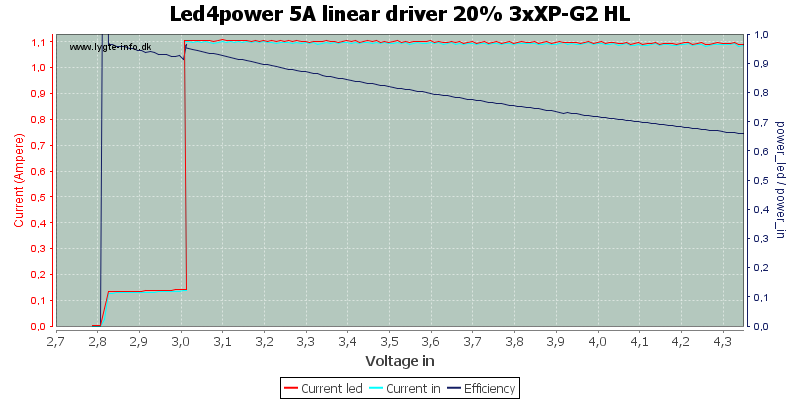
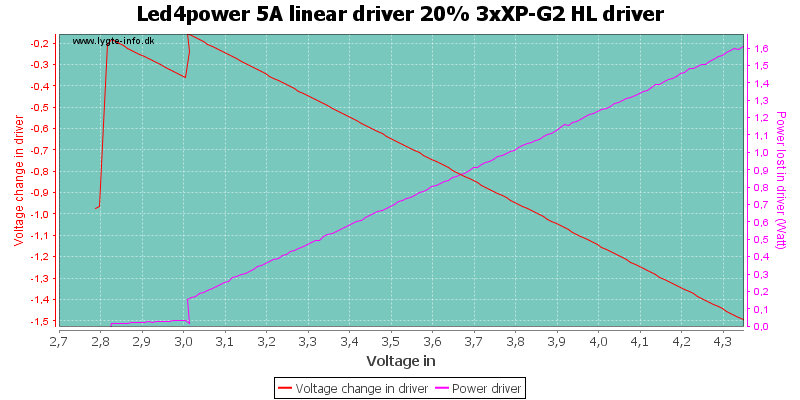
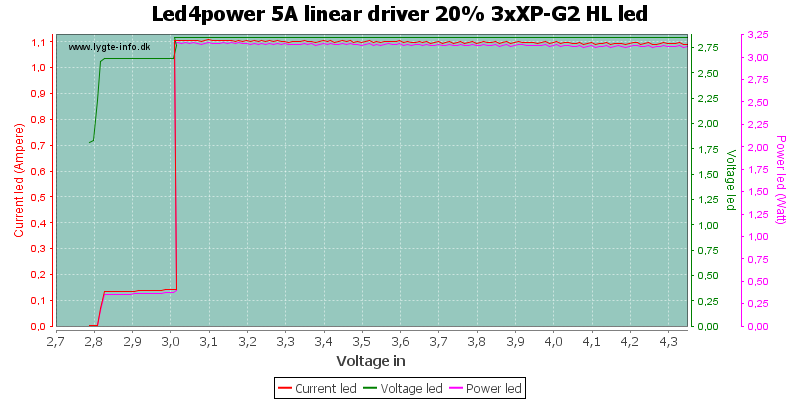
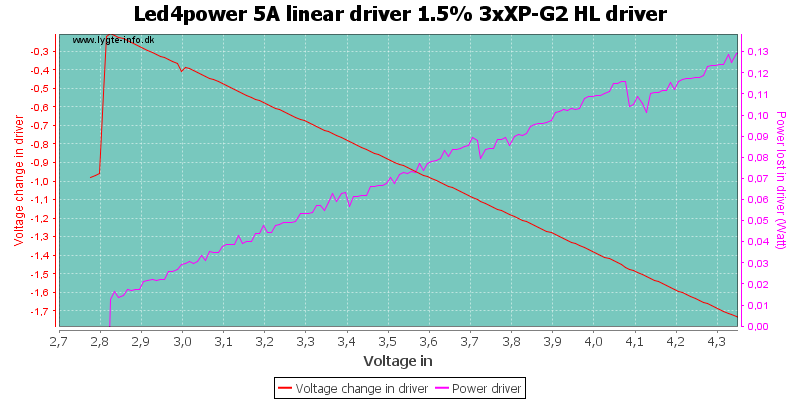
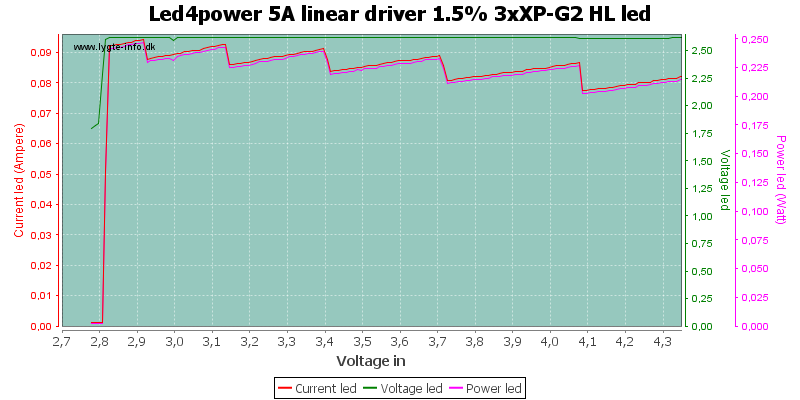
1.5% 3xXP-G2 with fix installed
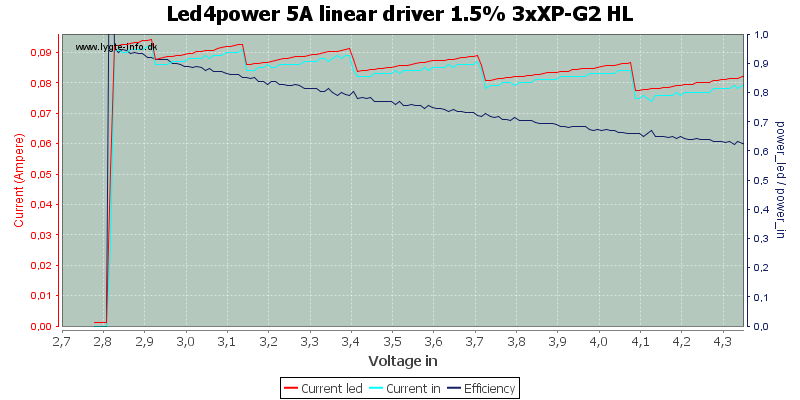
The saw tooth in the regulation shows up again.
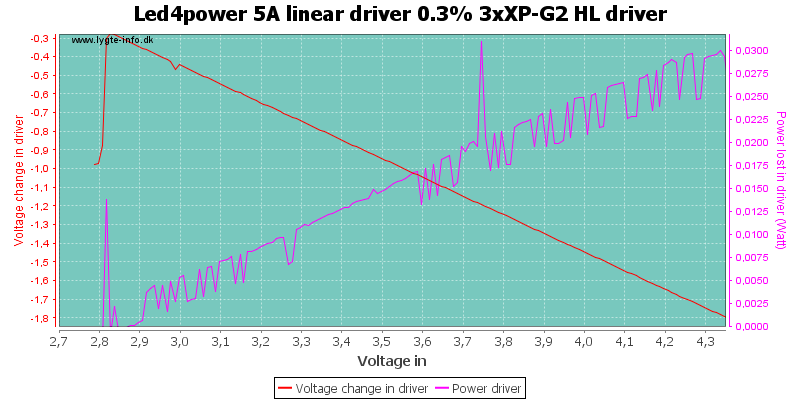
0.3% 3xXP-G2 with fix installed
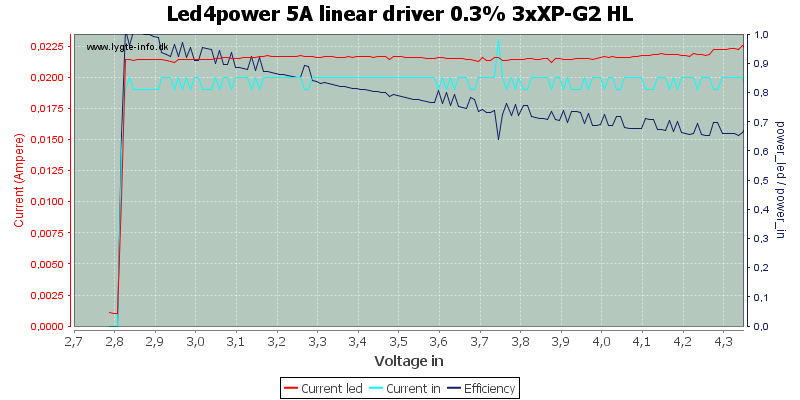
And at the lowest level the resolution of the current meter in my power supply can be seen.
Conclusion
The driver is a linear driver, this means the efficiency will depend on the voltage drop across the driver, making the driver better for XM-L2 leds than SST50 leds, because XM-L2 has higher voltage at high current. The driver does not use PWM to regulate brightness, this improves the efficiency in low modes.
The different UI's is interesting and works well (Just be careful not to hold down the button to long time).
I believe that the temperature trip point is too low, especially when using a high battery voltage (Led4power will change this).
With a few small adjustments this will be a good driver.
With the fix installed, this is a good driver and the problem with the temperature trip point has nearly disappeared.
Notes
The test was done with a fan to cool the driver, this cooling does not necessary match the real life condition.
The driver was supplied by a Led4power for review.
How do I test a led driver
List of all tested drivers


